6MA Fill Indicator MTF (Paired, SMA/EMA Selectable)6MA Fill Indicator MTF(移動平均ペア塗り分けインジケーター)
This indicator displays 3 customizable pairs of moving averages (MA), each on any selectable timeframe and type (SMA or EMA), with fill coloring to visually indicate trend direction between short and long MA within each pair.
このインジケーターは、最大3ペア(計6本)の移動平均線を異なる時間軸と種類(SMAまたはEMA)で表示し、ペア間を色で塗り分けることで、トレンドバイアスの視認性を向上させます。
Features / 機能説明
3 MA pairs configurable individually
(type, length, timeframe for each MA)
3つのMAペアそれぞれに対し、期間・種類・時間軸を個別に設定可能
Color fill between each MA pair
Blue fill if short MA > long MA (bullish bias)
Red fill if short MA < long MA (bearish bias)
各ペア内で短期MAが長期MAを上回ると青、下回ると赤で塗りつぶし表示
Multi-timeframe support
任意の時間足(MTF)に対応し、中長期のトレンド認識に有効
Use Cases / 主な用途
Multi-timeframe trend alignment
複数時間軸でのトレンド整合性確認
Trend-following strategy support
トレンドフォロー系戦略の補助
Quick visual market context recognition
トレンド環境の視覚的な高速把握
Moving Averages

SMA 90 Crossover Signalمؤشر Samer MA Flow هو أداة فنية متقدمة تعتمد على ثلاثة متوسطات متحركة بسيطة (SMA) بفترات 45 و90 و180.
يعتمد المؤشر على سلوك السعر حول المتوسط 90 (الخط الأزرق) لتوليد إشارات دخول وخروج واضحة:
• إشارة شراء عندما يخترق السعر SMA 90 صعودًا.
• إشارة بيع عندما يكسر السعر SMA 90 هبوطًا.
كما يُظهر المؤشر SMA 45 و180 لمتابعة الاتجاه العام والزخم بشكل بصري واضح.
الميزات:
• إشارات دخول/خروج بسيطة وفعالة.
• يعرض SMA 45 / 90 / 180 بوضوح.
• يعمل على جميع الفريمات الزمنية.
• مناسب للمبتدئين والمحترفين.
• يمكن دمجه مع أدوات فنية أخرى
Samer MA Flow is an advanced yet simple indicator based on three Simple Moving Averages (SMA): 45, 90, and 180.
It generates clear buy and sell signals based on price interaction with the SMA 90 (the blue line):
• Buy signal when the price crosses above SMA 90.
• Sell signal when the price crosses below SMA 90.
The indicator also displays SMA 45 and 180 to help identify trend structure and momentum visually.
Features:
• Simple and effective entry/exit signals.
• Visualizes SMA 45 / 90 / 180.
• Works on all timeframes.
• Suitable for beginners and professionals.
• Easy to combine with other technical tools

EMA Cross Arrows & LinesEMA Cross Arrows & Lines: Essential Trend & Signal Visualizer
A powerful and intuitive Pine Script v6 indicator, "EMA Cross Arrows & Lines" provides clear visual signals and trend insights directly on your price chart.
Key Features :
Multi-Timeframe Crossovers :
Independent Timeframe Input: Define a specific timeframe (e.g., "15" minutes default, 1h, 4h) for EMA calculations and cross detection, independent of your chart's current view. This is achieved using Pine Script's request.security() function to fetch data from the chosen timeframe, providing higher-timeframe context on any chart.
Visual Arrows: Plots clear yellow triangles for 20 EMA / 50 EMA bullish (up) and bearish (down) crosses. Arrows dynamically adjust position based on Average True Range (ATR) to ensure optimal visibility and avoid obscuring price action.
Three Key EMA Lines:
EMA 20 (Fast): Customizable length & color (default Blue).
EMA 50 (Slow): Customizable length & color (default Orange).
EMA 800 (Long-Term): Customizable length & color (default Purple).
These EMAs help visualize short-term momentum, medium-term trend, and long-term market direction.
Integrated Alerts:
Receive timely alerts for both 20/50 EMA Bullish Crossovers and Bearish Crossovers on your chosen timeframe.
Alert messages include dynamic {{ticker}} and {{close}} placeholders for precise information.
Seamless Chart Overlay: Designed with overlay=true to plot all elements directly on your main price chart for consolidated analysis, without opening a separate pane.
Underlying Logic & Concepts:
This indicator combines a classic EMA crossover strategy for momentum signals with multi-timeframe analysis for trend confirmation. The 20/50 EMA cross identifies shifts in short-term price direction, while the 800 EMA acts as a long-term trend filter. The request.security() function is crucial for performing calculations on the specified higher timeframe, allowing the indicator to provide relevant signals regardless of the chart's current resolution. The use of nz(ta.atr(14)) ensures robust arrow placement by adapting to market volatility.
How to Use This Indicator:
Add to Chart: Search for "EMA Cross Arrows & Lines" in your TradingView Indicators & Strategies window and add it to your chart.
Customize Settings: Open the indicator's settings (⚙️ icon) to adjust:
EMA & Cross Timeframe: Set the timeframe for EMA calculations (e.g., "15" for 15 minutes, "60" for 1 hour).
Fast EMA Length, Slow EMA Length, Long-Term EMA Length: Modify these to fit your strategy.
EMA 20 Color, EMA 50 Color, EMA 800 Color: Choose your preferred visual scheme.
Set Up Alerts: Go to the Alerts panel in TradingView, create a new alert, select this indicator, and choose either "15-Min Bullish Cross Alert" or "15-Min Bearish Cross Alert" as the condition.
Interpret Signals: Use the arrows for momentum signals, the EMA lines for trend confirmation (especially the 800 EMA), and the multi-timeframe capability to align your trades with higher-timeframe biases.
Ideal For: Trend analysis, momentum trading, signal confirmation, and identifying potential entry/exit points for swing, day, and trend traders.

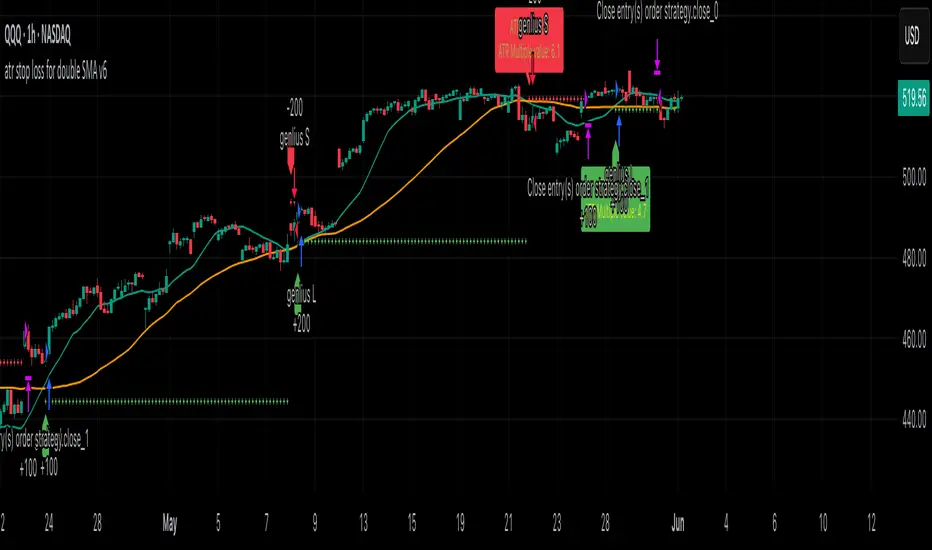
atr stop loss for double SMA v6Strategy Name
atr stop loss for double SMA v6
Credit: This v6 update is based on Daveatt’s “BEST ATR Stop Multiple Strategy.”
Core Logic
Entry: Go long when the 15-period SMA crosses above the 45-period SMA; go short on the inverse cross.
Stop-Loss: On entry, compute ATR(14)×2.0 and set a fixed stop at entry ± that amount. Stop remains static until hit.
Trend Tracking: Uses barssince() to ensure only one active long or short position; stop is only active while that trend persists.
Visualization
Plots fast/slow SMA lines in teal/orange.
On each entry bar, displays a label showing “ATR value” and “ATR×multiple” positioned at the 30-bar low (long) or high (short).
Draws an “×” at the stop-price level in green (long) or red (short) while the position is open.
Execution Settings
Initial Capital: $100 000, Size = 100 shares per trade.
Commission: 0.075% per trade.
Pyramiding: 1.
Calculations: Only on bar close (no intra-bar ticks).
Usage Notes
Static ATR stop adapts to volatility but does not trail.
Ideal for trending, liquid markets (stocks, futures, FX).
Adjust SMA lengths or ATR multiple for faster/slower signals.
5 EMA (8/20/50/100/200)This Indicator is a combination of 5 EMA include 8,20,50,100,200.
Instead of adding multiple of them and cluttering the page,i have added all of them to the list.


EMA 34/72 CrossoverThe indicator is a trend follower that changes color according to the asset's phases.
Ele está configurado para este ciclo atual do bitcoin.

EMA for Stratagems Strategy by xDSHxThe EMA indicator for the Stratagem 2025 strategy
The following EMAs are calculated:
- Fast EMA on the current TF
- Slow EMA on the current TF
- Fast EMA on the older TF
- Slow EMA on high TF
For a slow EMA on the current TF, the stop loss level is calculated.


EMA + SMA All in One KryptologyChainThis script plots 11 Exponential Moving Averages (EMAs) and 11 Simple Moving Averages (SMAs) on your TradingView chart, each with distinct colors and styles for easy identification.
EMAs are plotted as solid lines.
SMAs are plotted as dotted lines (circle markers) with slight transparency to differentiate them from EMAs.
The moving averages cover key lengths used in technical analysis (e.g., 9, 21, 50, 100, 200).
The script calculates EMAs & SMAs for the following lengths:
9, 10, 11, 21, 38, 50, 61, 65, 100, 190, 200


5/20 EMA Entry + 1/5 Cross-Count ExitThis script generates entry signals whenever the 5-period EMA crosses the 20-period EMA. A “BUY” label appears when the 5 EMA moves above the 20 EMA, and a “SELL” label appears when it moves below. Once a position is taken, the script begins counting every crossover between the 1-period EMA and the 5-period EMA. As soon as the first EMA(1)/EMA(5) cross occurs after entry, the script closes the trade and plots an “EXIT BUY” or “EXIT SELL” label on that bar. This ensures that each trade is exited on the very first short-term momentum shift (1/5 EMA cross) following the initial 5/20 EMA signal.

Golden Triangle Strategy (1H, Setup 1 & 2)🔺 Golden Triangle Strategy – Setup 1 & 2 with Dynamic Trailing Stop (Optimized for 1H Chart)
### 📘 Strategy Summary
This strategy blends **technical pattern recognition** with **volume confirmation** and **dynamic risk management** to capture high-probability breakouts. It features two independent entry setups . More details can be found at thepatternsite.com
I have added intelligent trailing stop that **tightens once a profit threshold is reached**. Please note that this is not mentioned in GoldenTriangle strategy. I just added to capture the profits.
### ✅ Entry Setups
#### **Setup 1 – Golden Triangle Breakout**
* Detects **triangle formations** using recent pivot highs and lows.
* A **bullish breakout** is confirmed when:
* Price **closes above the triangle top**, and
* Price is also **above the 50-period SMA**.
* Entry: At breakout candle close.
* Ideal for early momentum trades after consolidation.
#### **Setup 2 – Price + Volume Confirmation**
* Based on **mean reversion followed by volume surge**:
* Price drops **below the 50 SMA**, then closes **back above it**.
* Requires at least one **"up day"** (current close > previous close).
* Volume must be:
* Above its 50-SMA, **and**
* Higher than each of the **previous 4 days**.
* Entry: At the close of volume-confirmation day.
* Useful when triangle patterns are not clear, but accumulation is strong.
---
### 📈 Entry Logic Recap
| Condition | Setup 1 | Setup 2 |
| ------------------ | --------------------- | --------------------------------------- |
| Pattern | Triangle Breakout | SMA Reclaim + Volume Surge |
| SMA Filter | Close > 50 SMA | Price drops < 50 SMA, then closes above |
| Volume Requirement | Not Required | > Volume SMA + > last 4 bars |
| Entry Trigger | Breakout candle close | After volume confirmation |
---
### 🚪 Exit Strategy
#### 🔁 **Trailing Stop Loss (TSL)**
* **Initial stop:** 10% below the **highest price reached** after entry.
* **Tightening rule:**
* When profit reaches **10%**, the trailing stop is **tightened to 5%**.
* This keeps you in the trade while locking in more profit as the trade moves in your favor.
#### 🔻 **Manual Close**
* If the price drops below the trailing stop, the position is automatically closed using `strategy.close()`.
---
### 🌈 Visual Aids & Additions
* Green background shading while in a trade.
* Real-time dashboard showing:
* SMA values
* Entry signals
* Plots for:
* Dynamic trailing stop
* Weekly Fibonacci R3 and S3 levels as outer support/resistance zones.
---
### 🧠 Ideal Use Cases
* Works well on **1-hour charts** for intraday to short swing trades.
* Especially effective in **sideways-to-bullish markets**.
* Helps avoid false breakouts by using SMA and volume filters.
---
Tip: I also showed weekly R3 on the chart. When the price touches at this level lock your profits. You Dont have to wait until price hits trailing stop loss.
warning : This strategy is published educational purposes only.

PM Levels + SMA 9 By JadraThis indicator automatically identifies pre-market high and low levels (4:00-9:30 AM ET) and marks them with blue horizontal lines that extend throughout the entire trading session. Additionally includes a 9-period Simple Moving Average in red for trend analysis. Perfect for NYSE and NASDAQ traders who use these key levels as support and resistance. Features color-coded backgrounds: yellow for pre-market, transparent for regular hours, and blue for post-market. Lines remain visible from pre-market through market close, providing constant visual references for making trading decisions based on these important psychological levels combined with moving average trend confirmation.

VWAP 14 & EMA 8 RibbonIndicator that shows when 8 EMA crosses the VWAP 14. I have found this cross to be very bullish on the weekly timeframe. The VWAP 14 on its own serves as a good support and resistance as well. Very effective on the daily as well and even the 4 hour timeframe.

Interpolated Median Volatility LSMA | OttoThis indicator combines trend-following and volatility analysis by enhancing traditional LSMA with percentile-based linear interpolation applied to both the Least Squares Moving Average (LSMA) and standard deviation. Rather than relying on raw values, it uses the interpolated median (50th percentile) to smooth out noise while preserving sensitivity to significant price shifts. This approach produces a cleaner trend signal that remains responsive to real market changes, adapts to evolving volatility conditions, and improves the accuracy of breakout detection.
Core Concept
The indicator builds on these core components:
LSMA (Least Squares Moving Average): A linear regression-based moving average that fits line using user selected source over user defined period. It offers a smoother and more reactive trend signal compared to standard moving averages.
Standard Deviation shows how much price varies from the mean. In this indicator, it’s used to measure market volatility.
Volatility Bands: Instead of traditional Bollinger-style bands, this script calculates custom upper and lower bands using percentile-based linear interpolation on both the LSMA and standard deviation. This method produces smoother bands that filter out noise while remaining adaptive to meaningful price movements, making them more aligned with real market behavior and helping reduce false signals.
Percentile interpolation estimates a specific percentile (like the median — the 50th percentile) from a set of values — even when that percentile doesn't fall exactly on one data point. Instead of selecting a single nearest value, it calculates a smoothed value between nearby points. In this script, it’s used to find the median of past LSMA and standard deviation values, reducing the impact of outliers and smoothing the trend and volatility signals for more robust results.
Signal Logic: A long signal is identified when close price goes above the upper band, and a short signal when close price goes below the lower band.
⚙️ Inputs
Source: The price source used in calculations
LSMA Length: Period for calculating LSMA
Standard Deviation Length: Period for calculating volatility
Percentile Length: Period used for interpolating percentile values of LSMA and standard deviation
Multiplier: Controls the width of the bands by scaling the interpolated standard deviation
📈 Visual Output
Colored LSMA Line: Changes color based on signal (green for bullish, purple for bearish)
Upper & Lower Bands: Volatility bands calculated using interpolated values (green for bullish, purple for bearish)
Bar Coloring: Price bars are colored to reflect signal state (green for bullish, purple for bearish)
Optional Candlestick Overlay: Enhances visual context by coloring candles to match the signal state (green for bullish, purple for bearish)
How to Use
Add the indicator to your chart and look for signals when close price goes above or below the bands.
Long Signal: close Price goes above the upper band
Short Signal: close Price goes below the lower band
🔔 Alerts:
This script supports alert conditions for long and short signals. You can set alerts based on band crossovers to be notified of potential entries/exits.
⚠️ Disclaimer:
This indicator is intended for educational and informational purposes only. Trading/investing involves risk, and past performance does not guarantee future results. Always test and evaluate strategies before applying them in live markets. Use at your own risk.

EMA Trend Strength [Enhanced]This script shows the trend of the ticker. It paints five states: when the previous closing price is above 10EMA, which is greater than the 20 EMA, and the 20 EMA is greater than the 50 SMA - Very Bullish. When the previous closing price is above 10EMA and 10EMA is > 20EMA - Bullish. Vice versa for Very Bearish and Bearish. All other states are labelled "Neutral". The script allows you to adjust the background colours and colour and appearance of the MA lines.
Use at your own risk :). No warranty of any kind is provided or implied.

Institutional Breakout BreakdownBULLISH CONFIRMATION / BUY SIGNAL
SMA 150 crossover combined with the following
VOLUME SPIKE > 2X average volume
RSI > 55
BREAK ABOVE RESISTANCE

Cumulative Moving Average (CMA)This script calculates a Cumulative Moving Average (CMA) with an optional anchoring by date. It enables users to analyze long-term trends either within a specific date range or across the entire historical data of the asset

Momentum HUD (Enhanced with VWAP)*********** TRADERS YOU MUST DOUBLE CLICK THE MOMENTUM HUD TO SET WHAT YOU'RE TRADING, DROP DOWN FOR ETH SET FOR SPY SPX QQQ IWM NDX or OTHER STOCKS and below you PICK YOUR STOCK so it will form the 13 EMA 48 EMA 200 EMA and VWAP for you ***********
This one took all weekend, enjoy fam!!!!
The Momentum HUD (Enhanced with VWAP) is a powerful, all-in-one trading indicator designed to identify high-probability buy and sell signals for ETH-based indices (QQQ, SPY, SPX, IWM, NDX) or custom stocks like AAPL. It combines momentum, RSI, MACD, ADX, EMAs (13, 48, 200), VWAP, and volume analysis to generate actionable "CALLS" (buy) and "PUTS" (sell) signals. A customizable heads-up display (HUD) table provides real-time insights into key metrics, making it ideal for traders seeking a comprehensive technical analysis tool.
This indicator also supports support and resistance analysis indirectly through price interactions with EMAs and VWAP, which often act as dynamic support (e.g., 200 EMA) or resistance (e.g., VWAP rejection). Signals are filtered by an ATR-based volatility check and a cooldown period to reduce noise, ensuring robust trading decisions.
Key Features
Multi-Indicator Signals: Combines Momentum, RSI, MACD, ADX, EMAs, and VWAP for precise buy/sell signals.
Dynamic Support/Resistance: Uses EMA 13, EMA 48, EMA 200, and VWAP to highlight key price levels (e.g., price crossing EMA 13 for support or rejecting VWAP for resistance).
Customizable HUD Table: Displays real-time metrics (Momentum, RSI, MACD, ADX, EMA 200, VWAP) with bullish/bearish status and thresholds.
Symbol Flexibility: Supports ETH-based indices (QQQ, SPY, SPX, IWM, NDX) or any custom stock via user input.
Volatility Filter: Optional ATR filter ensures signals align with sufficient market volatility.
Cooldown Mechanism: Prevents over-signaling with a user-defined cooldown period.
Visual Cues: Plots EMAs, VWAP, buy/sell triangles, and labels for clear visualization.
Alert System: Configurable alerts for buy ("CALLS") and sell ("PUTS") signals.
How It Works
The indicator generates signals based on a confluence of conditions:
Buy Signals (CALLS): Triggered when price crosses above EMA 13 or bounces off VWAP, with positive momentum, RSI > 65, MACD bullish crossover, ADX > 25, price above EMA 200/VWAP, and high volume.
Sell Signals (PUTS): Triggered when price crosses below EMA 48 or rejects EMA 200/VWAP, with negative momentum, RSI < 35, MACD bearish crossover, ADX > 25, price below EMA 200/VWAP, and high volume.
Support/Resistance Context: EMA 200 and VWAP often act as support (e.g., ETH at $2,531–$2,600) or resistance (e.g., ETH at $2,695–$2,800), enhancing signal reliability.
HUD Table: Displays real-time values, status (Bullish/Bearish), and thresholds for all metrics, positioned at a user-defined chart location.
Usage Instructions
Add to Chart: Open TradingView’s Pine Editor, paste the script, and click “Add to Chart.”
Select Symbol: Choose from QQQ (ETH), SPY (ETH), SPX (ETH), IWM (ETH), NDX (ETH), or enter a custom stock symbol (e.g., AAPL).
Adjust Settings: Customize inputs (see below) to match your trading style and timeframe (e.g., intraday or daily).
Interpret Signals:
Green Triangles (CALLS): Indicate buy opportunities below the price bar.
Red Triangles (PUTS): Indicate sell opportunities above the price bar.
EMA/VWAP Lines: Monitor for price interactions (e.g., bounces or rejections) to confirm support/resistance levels.
Set Alerts: Use the built-in alert conditions (“Momentum Buy Signal” or “Momentum Sell Signal”) to receive notifications.
Combine with Analysis: Pair with additional tools (e.g., pivot-based support/resistance scripts) to validate key levels like ETH’s $2,531 support or $2,695 resistance.
Input Settings
Momentum Length: Period for momentum calculation (default: 14).
RSI Length: RSI period (default: 14).
RSI Buy/Sell Thresholds: RSI levels for buy (default: 65) and sell (default: 35).
MACD Fast/Slow/Signal Lengths: MACD settings (default: 12/26/9).
ADX Length/Threshold: ADX period (default: 14) and trend strength threshold (default: 25).
EMA Lengths: Periods for EMA 13, 48, and 200 (default: 13, 48, 200).
Volume Threshold: Multiplier for volume above 20-period average (default: 1.5x).
Signal Cooldown: Bars between signals to reduce noise (default: 5).
ATR Volatility Filter: Enable/disable ATR filter (default: true) and set ATR length (default: 14) and threshold (default: 0.75% of price).
Table Position: HUD placement (options: top_right, top_left, bottom_right, bottom_left).
Symbol Choice: Select ETH-based indices or custom stock (default: QQQ (ETH)).
Custom Stock Symbol: Input ticker for custom stocks (default: AAPL).
Label Colors: Customize text colors for EMA 13, EMA 48, EMA 200, and VWAP labels (default: black).
Example Use Case
For ETH (via QQQ): On a daily chart, set symbol_choice to “QQQ (ETH).” Monitor for buy signals when ETH crosses above $2,600 (EMA 13) with RSI > 65 and high volume, confirming support. Sell signals may trigger if ETH rejects $2,695 (VWAP) with RSI < 35, indicating resistance.
For Stocks (e.g., AAPL): Set custom_symbol to “AAPL.” Look for buy signals when price bounces off EMA 200 (support) and sell signals when price rejects VWAP (resistance).
Notes
Timeframe: Works on any timeframe, with intraday defaulting to the chart’s period and others to daily.
Support/Resistance: Combine with a pivot-based script (e.g., pivot highs/lows) to explicitly plot static support/resistance levels alongside dynamic EMAs/VWAP.
Risk Management: Always use proper risk management, as indicators are not foolproof.
Performance: Best used in trending markets (ADX > 25) and with confirmation from other tools.
Disclaimer
This indicator is for educational and informational purposes only and should not be considered financial advice. Always conduct your own research and consult a financial advisor before trading.
This info page is ready for TradingView’s publication requirements. It highlights the script’s functionality, ties in support/resistance context (per your ETH request), and provides clear instructions. Before publishing, ensure your TradingView account meets their requirements (e.g., verified profile). If you need tweaks or additional features (e.g., explicit support/resistance plotting), let me know!

ZLTSv3Using AlgoAlpha's Zero Lag trend signals. Focused on shrinking the size of the table and indicator name to have more viewing of the chart.
Tie it with other indicator based around TCG AI Tools. The modification I made to that indicator is to show multi timeframe rsi's in addition to using it for the 12/26 ema trend ribbon and notifying when bb and rsi go to extremes.
I hope these help others on their journey to profitability.

Combined Trading System: EMAs + ATR + RSIThis indicator gives entry and exit based on rsi , moving average and atr trailing stop

Indicator Buy Sell by Daraviththis indicator make for help trader about signal buy sell and trend line

Multi MA 10 Lines PRO (Custom Label + ATR Cross)Headline
Multi MA 10 Lines PRO — Custom Label & ATR Cross
All-in-One Professional Moving Average Toolkit for Serious Traders.
Description
Multi MA 10 Lines PRO (Custom Label + ATR Cross)
This indicator gives you the ultimate flexibility for trend analysis and market momentum:
Up to 10 fully-customizable Moving Averages: Select from EMA, SMA, WMA, HMA, VWMA, or RMA, set independent timeframes, colors, and styles for each line.
Pro Custom MA Label: Display value and % distance from current price at the end of each MA. Adjust label size, color, content, and visibility.
ATR Crossover Signal: Instantly visualize every crossover between MA1 & MA2 with a vivid ATR bar and a label showing “Cross: ” right at the event. Fine-tune ATR period, signal color, and label style.
Streamlined & Professional Visualization: Designed for advanced users needing clarity in complex setups — minimal chart clutter, powerful signal display, and maximum configurability.
Whether you’re a trend follower, scalper, or swing trader — this toolkit is made to adapt to your strategy and charting workflow.
Tip: Use the MA1 & MA2 cross/ATR as dynamic trade trigger, and combine the custom MA labels for multi-timeframe confluence!
