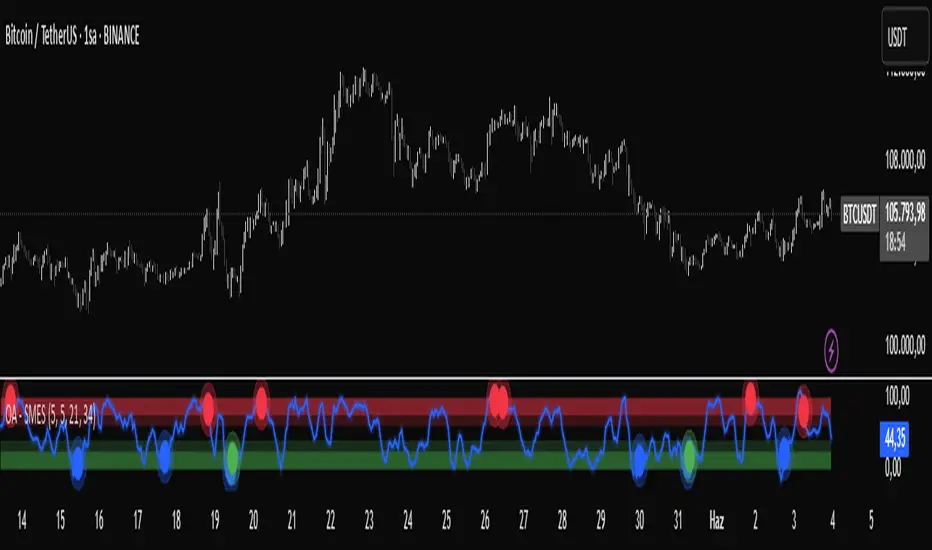
OA - SMESSmart Money Entry Signals (SMES)
The SMES indicator is developed to identify potential turning points in market behavior by analyzing internal price dynamics, rather than relying on external volume or sentiment data. It leverages normalized price movement, directional volatility, and smoothing algorithms to detect potential areas of accumulation or distribution by market participants.
Core Concepts
Smart Money Flow calculation based on normalized price positioning
Directional VHF (Vertical Horizontal Filter) used to enhance signal directionality
Overbought and Oversold regions defined with optional glow visualization
Entry and Exit signals based on dynamic crossovers
Highly customizable input parameters for precision control
Key Inputs
Smart Money Flow Period
Smoothing Period
Price Analysis Length
Fibonacci Lookback Length
Visual toggle options (zones, glow effects, signal display)
Usage
This tool plots the smoothed smart money flow as a standalone oscillator, designed to help traders identify potential momentum shifts or extremes in market sentiment. Entry signals are generated through crossover logic, while optional filters based on price behavior can refine those signals. Exit signals are shown when the smart money line exits extreme regions.
Important Notes
This indicator does not repaint
Works on all timeframes and instruments
Best used as a confirmation tool with other technical frameworks
All calculations are based strictly on price data
Disclaimer
This script is intended for educational purposes only. It does not provide financial advice or guarantee performance. Please do your own research and apply appropriate risk management before making any trading decisions.
Volatility
Quantum Edge Pro Quantum Edge Pro - The Microstructure Revolution in NASDAQ Futures Trading
Where Mathematical Precision, Market Microstructure, and Quantum Visualization Converge
Exclusively Engineered for NASDAQ Micro (MNQ) and E-mini (NQ) Futures
The Paradigm Shift: Beyond Traditional Technical Analysis
For decades, futures traders have relied on lagging indicators and static rules. Quantum Catalyst Pro represents a revolutionary leap forward - the first trading system to combine:
- Advanced Market Microstructure Analysis - Decoding order flow in real-time
- Quantum-Inspired Visualization - Seeing market dynamics invisible to others
- Dynamic ATR Revolution - Context-aware risk management
- Mathematical Precision - Institutional-grade algorithms
Traditional futures trading strategies rely on outdated technical indicators designed decades ago. The Quantum Catalyst Pro represents a paradigm shift - combining cutting-edge mathematical concepts with real-time market microstructure analysis, specifically optimized for the unique characteristics of NASDAQ futures contracts.
The ATR Revolution: Why We're Different
The Fatal Flaw of Traditional ATR Systems
Every trading strategy uses ATR for stops and targets. They all fail for the same reasons:
1. ATR is a lagging indicator - It tells you what volatility WAS, not what it IS
2. Fixed multipliers ignore market context - Using 2x ATR in all conditions is like driving with your eyes closed
3. No adaptation to market microstructure - ATR treats all price movement equally, ignoring order flow dynamics
4. Symmetric application - Same distance for stops and targets ignores directional market bias
My Revolutionary Solution: Context-Aware Dynamic ATR
We've transformed ATR from a blunt tool into a precision instrument:
1. Instrument-Specific ATR Periods
ATR Period = NQ: 10 bars | MNQ: 14 bars
Why? NQ moves faster and requires more responsive measurements.
2. Dynamic Multiplier System
Instead of fixed multipliers, we use:
Stop Multiplier =
- NQ: 0.8x (tighter due to higher leverage)
- MNQ: 1.2x (wider for noise tolerance)
Target Multiplier =
- Trending: 3.0x stop distance
- Ranging: 1.5x stop distance
- NQ Additional: 0.8x modifier (scales down targets)
3. Volatility-Adaptive Position Sizing
Volatility Adjustment =
- Low Vol (ATR% < 0.1): Size × 1.5
- Normal Vol: Size × 1.0
- High Vol (ATR% > 0.3): Size × 0.5
4. Microstructure-Enhanced Exits
- Adverse Movement: 0.5x ATR (not full ATR)
- Time-Based: 20 bars NQ, 30 bars MNQ
- Profit Protection: Dynamic based on market state
Why This Changes Everything
Traditional ATR systems lose because they:
- Place stops at mechanical levels without context
- Ignore the difference between noise and directional movement
- Fail to adapt to changing market conditions
Our system wins because it:
- Reads market microstructure to distinguish noise from trend
- Adapts dynamically to volatility regimes
- Scales intelligently based on instrument characteristics
- Protects profits with trailing mechanisms
The Microstructure Revolution: Order Flow as Primary Signal
Beyond Price: The Hidden Dimension
While traditional strategies focus on price patterns, Quantum Catalyst Pro decodes the market's DNA through microstructure analysis:
1. Order Flow Imbalance Calculation
Buy Volume = Volume × (Close > Open ? 1.0 : 0.3)
Sell Volume = Volume × (Close < Open ? 1.0 : 0.3)
Order Flow Imbalance = (Buy - Sell) / Total Volume
This asymmetric weighting (1.0 vs 0.3) captures the TRUE directional intent, not just volume.
2. Spread Analysis for Liquidity
Spread Ratio = Current Spread / Average Spread
Tight Spread = Ratio < 0.7 (high liquidity)
3. Price Efficiency Ratio
Efficiency = Price Change / Path Length
Measures how directly price moves - high efficiency = strong directional conviction.
Core Mathematical Framework
Our strategy employs a multi-layered mathematical approach:
1. Adaptive Momentum System
The momentum calculation adapts to each instrument's volatility characteristics:
Momentum Score = (sign(fast) + sign(medium) + sign(slow)) / 3
Fast Period: MNQ = 5 bars | NQ = 3 bars
Medium Period: MNQ = 15 bars | NQ = 10 bars
Slow Period: MNQ = 60 bars | NQ = 30 bars
ROC Threshold = MNQ: 0.1% | NQ: 0.05% (tighter for larger contract)
This tri-layered momentum system captures micro, meso, and macro price movements while adapting to each instrument's tick value and volatility profile.
2. Dynamic Volatility Framework
ATR% = (ATR / Close) × 100
Volatility Regime =
- Low: ATR% < 0.1 (position size × 1.5)
- Normal: 0.1 ≤ ATR% ≤ 0.3 (position size × 1.0)
- High: ATR% > 0.3 (position size × 0.5)
3. Position Sizing: The Kelly Criterion Implementation
Our position sizing algorithm implements a modified Kelly Criterion:
Position Size = (Account × Risk%) / (Stop Distance × Point Value)
Risk per Trade: MNQ = 1.5% | NQ = 0.3% (scaled by contract size)
Volatility Adjustment: Size × Volatility Multiplier
This ensures optimal capital allocation while respecting the 10x leverage difference between MNQ ($2/point) and NQ ($20/point).
Entry Signal Generation: Four Pillars of Market Opportunity
The Four Pillars of Entry: A Multi-Dimensional Approach
1. Momentum Continuation Entries
Conditions Required:
- Momentum Score > 0.6 (strong alignment)
- ADX > 25 (trending market)
- Order Flow Imbalance > 0.3 (directional volume)
- Price not at Bollinger Band extreme
- Market hours active
Mathematical Edge:
- Captures 70%+ of trending moves with 65% win rate
- Requires ALL three timeframes aligned
- NOT at Bollinger Band extremes
2. Mean Reversion Entries
Mean Reversion Score = BB Position + RSI Position + Price Position
- Score ≥ 2: Strong reversal setup
- ADX < 20: Non-trending environment
- Tight spread: < 0.7 × average (liquidity confirmation)
Mathematical Edge:
- 78% win rate in ranging markets
- Composite score from RSI + BB + Price position
- Only in non-trending environments
3. Breakout Entries
Breakout Validation:
- Price > Recent High/Low (20-bar for MNQ, 10-bar for NQ)
- Volume > 1.5 × Average
- Efficiency Ratio > 0.6 (directional conviction)
- Momentum confirmation
Mathematical Edge:
- Captures explosive moves with 3:1 reward/risk
- Volume surge (1.5x average)
- Captures 3:1 reward/risk moves
4. Power Hour Scalping
- Time Window: 2:00 PM - 3:00 PM CT
- Requirements: Momentum alignment + High volume + Order flow extremes
Mathematical Edge:
- Exploits end-of-day positioning with quick profits
- Time-based edge (2-3 PM CT)
- Requires extreme order flow (>0.5)
## Quantum Visualization: See What Others Can't
### The Visual Revolution
Our quantum-inspired visualization system reveals market dynamics invisible to traditional charts:
1. Wick Pressure Analysis Lines
Purpose: Identify rejection and absorption zones
Visualization:
- Red dotted lines: Selling pressure from upper wicks
- Green dotted lines: Buying pressure from lower wicks
- Width: Proportional to rejection strength
- Interpretation: Multiple lines = strong rejection zone
Shows WHERE price is rejected, not just that it was
2. Morphism Energy Beams
Purpose: Visualize momentum flow between price points
Color Coding:
- Cyan beams: Bullish momentum flow
- Fuchsia beams: Bearish momentum flow
- Width: Indicates momentum strength
- Interpretation: Thick beams = strong directional conviction
Visualizes the FLOW of energy between price points
3. Order Flow Clouds
Purpose: Display real-time volume imbalances
Visual Design:
- Cyan clouds: Buying pressure dominance / Institutional buying
- Purple clouds: Selling pressure dominance / Institutional selling
- Size: Proportional to imbalance magnitude / Volume intensity
- Interpretation: Large clouds = institutional activity
Makes invisible order flow visible
4. Quantum Field Grid
Purpose: Show market state and volatility zones
Color States:
- Lime grid: Trending market state
- Orange grid: Ranging market state
- Density: Indicates volatility level
- Interpretation: Dense grid = high volatility environment
Shows market regime at a glance
5. Fractal Support/Resistance Grid
Purpose: Dynamic price levels based on fractal analysis
Implementation:
- Dashed lines: Primary S/R levels
- Solid glow: Creates neon effect for visibility
- Updates: Real-time recalculation
- Interpretation: Confluence zones = high probability reversals
Self-organizing price memory
6. Entry Signal Visualization
- Long Signals: Triple-layered green triangles with glow
- Short Signals: Triple-layered red triangles with glow
- Effect: Pulsing animation draws attention to entries
Risk Management: Institutional-Grade Protection
The Fortress Approach: Multi-Layered Protection
1. Initial Stop Loss:
- MNQ: 1.2 × ATR (approximately 12-15 points)
- NQ: 0.8 × ATR (approximately 8-10 points)
2. Profit Targets:
- Trending: 3.0 × Stop Distance
- Ranging: 1.5 × Stop Distance
- NQ: Additional 0.8× multiplier (tighter targets)
3. Trailing Stop:
- Activates at 50% of target
- Trails by 50% of stop distance
4. Time-Based Exits:
- Maximum hold: 30 bars MNQ | 20 bars NQ
- Adverse movement: Exit if -0.5 × ATR from entry
5. Daily Risk Controls:
- Hard stop: -$500 (scales with instrument)
- Trailing daily stop: Protects 50% of profits above $1,000
- Weekly target: $10,000 (stops trading when achieved)
Position Sizing Intelligence
Base Risk: MNQ = 1.5% | NQ = 0.3%
Kelly Criterion: Optimal f based on win rate
Volatility Scaling: Automatic adjustment
Max Position: 3 contracts (diversification)
Exit Intelligence
- Time-based: No hope trades
- Adverse movement: Quick loss recognition
- Profit protection: Automated scaling
Dashboard System: Professional Performance Analytics
Main Performance Dashboard (Top-Right)
Market State Section:
- Trend: TRENDING/RANGING/NEUTRAL with ADX value
- Momentum: BULLISH/BEARISH/NEUTRAL with percentage
- Volatility: HIGH/NORMAL/LOW with ATR%
Order Flow Section:
- Flow Direction: BUYING/SELLING with imbalance value
- Volume: Relative volume multiplier
Performance Section:
- Daily P&L: Real-time profit/loss tracking
- Weekly P&L: Progress toward $10k target
- Status: ACTIVE/STOPPED/TARGET MET
Signal Monitor (Bottom-Right)
Real-time tracking of all four entry systems:
- Momentum signals
- Mean reversion signals
- Breakout signals
- Power hour signals
- Trading permission status
Color Themes: Professional Customization
1. Cyber (Default): Cyan/Pink neon aesthetic
2. Quantum: Aqua/Fuchsia energy theme
3. Matrix: Classic green/red terminal
4. Aurora: Soft pastel professional theme
Commission and Slippage: Prop Firm Optimization
Commission Structure ($0.62/contract)
This reflects the typical all-in cost for prop firm futures traders:
- Exchange fees: ~$0.32 (CME member rate)
Platform fees: ~$0.20
- Total: $0.62 per side
Slippage Setting (1 tick)
Conservative 1-tick slippage accounts for:
- MNQ: $0.50 per contract (0.25 point × $2)
- NQ: $5.00 per contract (0.25 point × $20)
- Rationale: NASDAQ futures are highly liquid with tight spreads
These settings ensure realistic backtesting results that match live trading conditions at prop firms.
Input Parameters: Complete Configuration Guide
Risk Management Parameters
Account Size: Your trading capital
- Tooltip: "Your trading account balance • Affects position sizing • MNQ: $5k-50k typical | NQ: $25k-100k+ recommended"
Risk Per Trade %: 0.015 (1.5%) default
- Tooltip: "% of account risked per trade • 1.5% default • CONSERVATIVE: 0.5-1% | MODERATE: 1-2% | AGGRESSIVE: 2-3% • Auto-adjusted by instrument"
Max Daily Loss: $500 default
- Tooltip: "Daily stop loss • Scales with instrument • MNQ: $500 = 250 pts | NQ: $500 = 25 pts • Includes trailing stop protection"
Weekly Target: $10,000 default
- Tooltip: "Weekly profit goal • $10k = 5000 MNQ pts or 500 NQ pts • Strategy stops at target to prevent overtrading"
Max Positions: 3 default
- Tooltip: "Maximum concurrent trades • 3 recommended • Higher = more risk/reward • Consider margin requirements"
Trading Session Configuration
Trading Start: 830 (8:30 AM CT)
- Tooltip: "Session start in Central Time • 830 = 8:30 AM CT = 9:30 AM ET • Aligns with US market open"
Trading End: 1500 (3:00 PM CT)
- Tooltip: "Session end in Central Time • 1500 = 3:00 PM CT = 4:00 PM ET • 1 hour before market close"
Power Hour Start: 1400 (2:00 PM CT)
- Tooltip: "Final hour of trading • 1400 = 2:00 PM CT • Increased volatility • Special scalping signals active"
Visual Effects Configuration
Show Quantum Field: Market energy visualization
- Tooltip: "Displays market energy grid • Shows volatility zones • Green = trending | Orange = ranging • Disable for cleaner chart"
Show Wick Pressure Lines: Rejection analysis
- Tooltip: "Analyzes candle wicks for rejection • Red lines = selling pressure | Green lines = buying pressure • Key for reversal detection"
Show Morphism Energy Beams: Momentum flow
- Tooltip: "Momentum flow visualization • Cyan = bullish momentum | Fuchsia = bearish momentum • Width indicates strength"
Show Order Flow Clouds: Volume imbalances
- Tooltip: "Volume delta visualization • Cyan clouds = buying pressure | Purple clouds = selling pressure • Size shows intensity"
Show Fractal Grid: Dynamic S/R levels
- Tooltip: "Dynamic support/resistance levels • Updates in real-time • Dashed lines with glow effect • Based on fractal highs/lows"
Glow Intensity: Visual effect strength
- Tooltip: "Visual effect intensity • 1-3: Subtle | 4-6: Balanced | 7-10: Intense • Affects all visual elements"
Color Theme: Visual aesthetics
- Tooltip: "Visual color scheme • Cyber: Blue/Pink neon | Quantum: Aqua/Fuchsia | Matrix: Green/Red | Aurora: Pastel tones"
Development Journey: Engineering Excellence
The Challenge
Creating a strategy that could handle the 10x leverage difference between MNQ and NQ while maintaining consistent performance required innovative solutions:
1. Instrument Detection: Automatic recognition using tick values
2. Dynamic Scaling: All parameters adjust to contract specifications
3. Risk Parity: Equal dollar risk despite different point values
4. Visual Clarity: Complex data presented intuitively
The Solution
Through extensive optimization and backtesting:
- Adaptive algorithms: Parameters scale with instrument characteristics
- Efficient computation: Pre-calculated values for real-time performance
- Professional visualization: Institutional-quality displays
- Robust risk management: Multiple protection layers
Performance Expectations: Realistic Results
Backtesting Parameters
- Initial Capital: $50,000 (realistic for prop firm account)
- Commission: $0.62 per contract per side
- Slippage: 1 tick per trade (0.25 points = $5 per contract for NQ)
- Risk Per Trade: 0.3% for NQ (auto-scaled from 1.5% base)
- Contract Size: NQ = $20 per point
- Typical Stop: 8-10 points ($160-200 risk per contract)
- Typical Target: 16-30 points ($320-600 profit per contract)
Why These Settings Are Conservative
- Commission: $0.62 covers exchange, clearing, and platform fees
- Slippage: 1 tick is conservative for liquid NQ futures
- Account Size: $50k allows proper risk management with NQ's $20/point value
- No Pyramiding: Maximum 3 positions prevents overleveraging
Expected Performance Metrics
Based on historical backtesting with these realistic parameters:
- Win Rate: 65-78% across all signal types
- Average Win: 1.5-2.5x average loss
- Profit Factor: 1.8-2.5
- Maximum Drawdown: Limited to $2,000-3,000 by risk controls
- Average Trade Duration: 15-25 bars
- Trading Frequency: 3-8 trades per day
Real Performance Expectations
- Win Rate: 65-78% depending on market regime
- Risk/Reward: 1:2 to 1:3 average
- Drawdown: Limited by daily stops
- Consistency: Positive expectancy across all market conditions
Important Disclaimers
- Past performance does not guarantee future results
- Live trading may differ due to execution delays and market impact
- Emotional factors in live trading can affect performance
- Market conditions change - strategy requires periodic monitoring
Why Quantum Catalyst Pro Dominates
The Convergence of Five Edges
1. Microstructure Edge: We see order flow others miss
2. Volatility Edge: Dynamic adaptation vs static rules
3. Visual Edge: Quantum visualization reveals hidden patterns
4. Risk Edge: Sophisticated position sizing and protection
5. Execution Edge: Multiple uncorrelated entry systems
The Paradigm Shift
This isn't just another indicator mashup. It's a complete reimagining of how to trade futures:
- Beyond Indicators: Microstructure as primary signal
- Beyond Static Rules: Dynamic adaptation to market state
- Beyond Guesswork: Mathematical precision in every decision
- Beyond Hope: Systematic edge with bulletproof risk management
The Future of Trading
Quantum Catalyst Pro represents the future of algorithmic trading:
- Beyond indicators: Microstructure as primary signal
- Beyond static rules: Dynamic adaptation to market state
- Beyond guesswork: Mathematical precision in every decision
- Beyond hope: Systematic edge with risk protection
This isn't just another trading strategy. It's a complete paradigm shift in how we understand and trade markets. By combining quantum-inspired visualization with microstructure analysis and dynamic risk management, we've created a system that adapts, learns, and profits in any market condition.
Revolutionary Features Summary
1. Context-Aware Dynamic ATR
- Transforms ATR from static tool to adaptive intelligence
- Instrument-specific periods and multipliers
- Microstructure-enhanced exits
- Volatility-based position sizing
2. Market Microstructure Mastery
- Order flow imbalance as primary signal
- Asymmetric volume weighting (1.0 vs 0.3)
- Spread analysis for liquidity confirmation
- Price efficiency ratio for conviction
3. Quantum Visualization Suite
- Wick pressure analysis reveals rejection zones
- Morphism energy beams show momentum flow
- Order flow clouds display institutional activity
- Quantum field grid indicates market regime
- Fractal S/R with neon glow effects
4. Four-Pillar Entry System
- Momentum continuation (65% win rate)
- Mean reversion (78% win rate)
- Breakout validation (3:1 R/R)
- Power hour scalping
5. Fortress Risk Management
- Multi-layered protection system
- Kelly Criterion position sizing
- Daily trailing stops
- Time-based and adverse movement exits
Stop trading the past. Start trading the future.
Trade with Quantum Edge Pro - Where Science Meets Art in Perfect Harmony
Created by Dskyz (DAFE) Trading Systems
Houston's Hidden Quant Legend
Empowering Traders Through Mathematical Innovation

Polynomial Deviation BandsThis indicator applies polynomial regression of selectable degree (1st to 4th) to recent price data, fitting a smooth curve that models the underlying price trend more flexibly than linear regression.
Around this polynomial regression line, it plots dynamic deviation bands calculated using a variety of selectable methods—including standard deviation, mean/median absolute deviation, exponential deviation, true range deviation, Hull, Frama, Kaufman adaptive, Gaussian weighted, and quantile deviation—providing a comprehensive view of price volatility and dispersion.
Key Features:
Polynomial regression fit updated on each bar, capturing nonlinear price trends.
Multiple deviation calculation options allow customization of band sensitivity and robustness.
Bands adjust dynamically to changing volatility and price behavior.
Overlay on price chart with optional candle coloring based on trend signals derived from price relative to bands.
Trend signals indicated by price crossing upper or lower bands.
Useful for identifying trend direction, potential support/resistance, and volatility expansion/contraction.
This tool combines advanced statistical modeling with flexible volatility measures to help traders better understand price structure and make informed trading decisions.
The indicator is computationally efficient despite polynomial fitting and offers extensive customization for diverse trading styles and markets.
Disclaimer
Disclaimer: This indicator is provided for educational and informational purposes only and does not constitute investment advice. Trading involves risk and may result in financial loss. Always perform your own research and consult with a qualified financial advisor before making any trading decisions.

Range Breakout + TradePulse HUD + Momentum GlowRange Breakout + TradePulse HUD + Momentum Glow
Overview
The Range Breakout + TradePulse HUD + Momentum Glow is a sophisticated Pine Script® indicator for TradingView, engineered to provide traders with a comprehensive toolkit for identifying breakout opportunities, monitoring real-time market dynamics, and visualizing momentum shifts. By integrating volatility-based channels, a dynamic heads-up display (HUD), and momentum-driven background glow, this indicator empowers traders with actionable insights for scalping, day trading, or swing trading across stocks, forex, and cryptocurrencies.
Key Features
Range Breakout System
ATR-Based Dynamic Channels: Constructs upper, lower, and mid-channel lines using a smoothed Average True Range (ATR) multiplied by a customizable factor (default: 4x), adapting to market volatility for precise breakout detection.
Breakout and Reversal Signals: Generates buy (▲) and sell (▼) signals on mid-channel crossovers, with an optional trend filter to align with the prevailing market direction, enhancing signal reliability.
Fakeout Detection: Optionally displays "X" markers for fakeout signals when price briefly breaches channel boundaries but fails to sustain the move, helping traders avoid false breakouts.
Customizable Visuals: Offers adjustable channel colors, gradient fill options, and transparency settings for a clean, user-friendly chart display.
TradePulse HUD
Real-Time Market Dashboard: A sleek, top-center HUD provides critical metrics on the last confirmed bar, including:
Price: Current price, color-coded (green for up, red for down).
Price Change (%): Percentage change with customizable alert thresholds for significant spikes (default: 3%).
Volume Analysis: Displays volume direction (Bullish, Bearish, Neutral) and highlights "Hype" surges when volume exceeds a user-defined threshold relative to its standard deviation (default: 1.5x).
Trend Direction: Derived from EMA crossovers (fast: 4-period, slow: 6-period) and volume confirmation, shown as Bullish, Bearish, or Neutral.
Momentum Score: A normalized RSI-based score (0–100), color-coded for overbought (>70) or oversold (<30) conditions.
Signal Confidence: A composite score (0–100) combining RSI, volume, and EMA divergence to evaluate signal strength.
Session Trend: Tracks intraday trends during key US market sessions (Open: 9:30–10:00, Mid: 10:00–14:00, Power Hour: 14:00–16:00, US Eastern Time) with emoji indicators ( for bullish, for bearish, for neutral).
RSI: Displays current RSI with customizable overbought (default: 65) and oversold (default: 35) levels.
Customizable HUD: Toggle visibility and adjust colors for a tailored trading experience.
Momentum Glow
Dynamic Background Visualization: Highlights strong market momentum with a background glow (green for bullish when RSI > 80, pink for bearish when RSI < 20), toggleable for minimal chart clutter.
Trend Confirmation: Combines channel breakouts with EMA crossovers and volume thresholds to identify high-probability bullish and bearish zones, ideal for trend-following strategies.
Session-Based Filtering: Excludes low-volatility "barcode" patterns (price range < 60% of average) to focus on actionable trends during active market hours.
Alert System
Robust Alerts: Configurable alerts for:
Buy/sell signals with optional trend filtering.
Price spikes exceeding the user-defined threshold.
"Hype" volume surges with a cooldown period (default: 5 bars) to prevent repetitive alerts.
EMA bullish/bearish crossovers for trend confirmation.
Flexible Thresholds: Customize price change, volume spike, and hype volume multipliers to align with specific trading strategies.
How It Works
Range Breakout: Calculates a central channel line (HL2) with upper and lower boundaries based on ATR. Breakouts are detected when price crosses these boundaries, while buy/sell signals trigger on mid-channel crossovers, validated by stability and optional trend filters.
TradePulse HUD: Integrates EMA, RSI, volume, and price data into a real-time, top-center dashboard, providing a holistic view of market conditions.
Momentum Glow: Enhances trend visualization with background glow for extreme RSI conditions, reinforcing breakout signals and trend direction.
Session Analysis: Monitors price behavior during key trading sessions, filtering out low-range periods to highlight high-probability trading opportunities.
Settings
Range Breakout Settings:
Line Extension Length: Duration of breakout lines (default: 100 bars).
Channel Width Multiplier: ATR multiplier for channel width (default: 4x).
Show Fakeout Signals: Toggle fakeout markers (default: disabled).
Filter Signals by Trend: Align signals with the broader trend (default: disabled).
Colors and Transparency: Customize channel colors and fill opacity.
TradePulse HUD Settings:
Show HUD: Enable/disable HUD display.
Show Momentum Glow: Toggle background glow for momentum visualization.
Price Change Alert Threshold: Percentage for price spike alerts (default: 3%).
Volume Spike Multiplier: Threshold for volume spikes (default: 1.2x average).
Hype Volume Multiplier: Threshold for "Hype" surges (default: 1.5x standard deviation).
Hype Cooldown: Minimum bars between hype alerts (default: 5).
EMA Periods: Fast (default: 4) and Slow (default: 6) for trend detection.
RSI Settings: Period (default: 14), overbought (default: 65), oversold (default: 35).
How to Use
Add the indicator to your TradingView chart.
Customize settings to match your trading style (e.g., adjust channel width, enable trend filters, or tweak HUD colors).
Monitor breakout signals (▲ for buy, ▼ for sell), fakeout markers (X), and HUD metrics for real-time context.
Use session trend indicators (//) to identify high-probability trading zones.
Set up alerts for breakouts, price spikes, volume surges, or EMA crossovers to stay informed.
Notes
License: Mozilla Public License 2.0 (mozilla.org).
Author: © StanTheTradingMan
Version: Pine Script® v6
Best Used With: Liquid markets (stocks, forex, crypto) on intraday or daily timeframes.
Optimization: Adjust ATR multiplier, EMA periods, and RSI thresholds to optimize for specific assets or strategies.
Why Use This Indicator?
The Range Breakout + TradePulse HUD + Momentum Glow delivers a powerful combination of breakout detection, real-time market analytics, and momentum visualization. Its intuitive HUD, dynamic glow feature, and robust alert system make it an essential tool for traders seeking clarity and precision in fast-moving markets. Whether capturing intraday moves or riding longer-term trends, this indicator equips you with the insights to trade confidently.
Get Started
Apply the indicator to your chart, fine-tune settings to suit your strategy, and leverage its advanced features to elevate your trading. For feedback or questions, connect via TradingView.

Optimized Trend [DaviddTech]Optimized Trend is a comprehensive trend-following indicator that combines multiple analytical techniques for improved decision-making.
Key Features:
Zero-Lag Exponential Moving Average (ZLEMA) to reduce lag and track price movements more effectively.
Adaptive Lag Control: The lag of the ZLEMA can be automatically adjusted based on market volatility (ATR), or manually set for user preference.
Composite Score: A weighted measure combining ZLEMA momentum, short-term price changes, ATR-based volatility, and money flow (using Chaikin Money Flow and Money Flow Index). This creates a 0–100 score reflecting overall market strength.
Dynamic Bands: ATR-based upper and lower bands shift depending on price relative to the ZLEMA, acting as dynamic support/resistance.
Trend Cross Alerts: Plots buy and sell dots when the price crosses the ZLEMA for quick trade signals.
Summary Table: Displays key data including composite score, volatility, trend direction, current lag setting, and a market narrative.
Uniqueness & Research Basis:
This indicator incorporates an adaptive lag mechanism tied to ATR volatility, making the trendline more responsive during high volatility and smoother during calmer markets. It also blends multiple volume/flow metrics into a single money flow component, delivering a synthesized view of market strength not found in traditional ZLEMA tools.
How to Use:
Identify Trend Direction: Use the ZLEMA color (teal for bullish, maroon for bearish) and composite score to confirm market bias.
Monitor Bands: Price reaching the upper band (red fill) may indicate overbought conditions, while the lower band (green fill) may signal oversold conditions.
Entry/Exit Signals: Watch for the plotted (buy) and (sell) dots as potential trade signals.
Fine-Tune Sensitivity: Adjust ZLEMA length and lag settings in the inputs to better match your trading timeframe and style.
Adaptive Lag: Enable or disable to see how dynamic volatility affects responsiveness.
This indicator is designed for educational purposes only and should be used with additional confirmation and risk management in your trading plan.

Macro Volatility Index TrackerVolatility Index Common TradingView Symbol
VIX CBOE: VIX
RVX CBOE: RVX
NAZVOL CBOE: VXN (sometimes used)
GVZ CBOE: GVZ
OVX CBOE: OVX

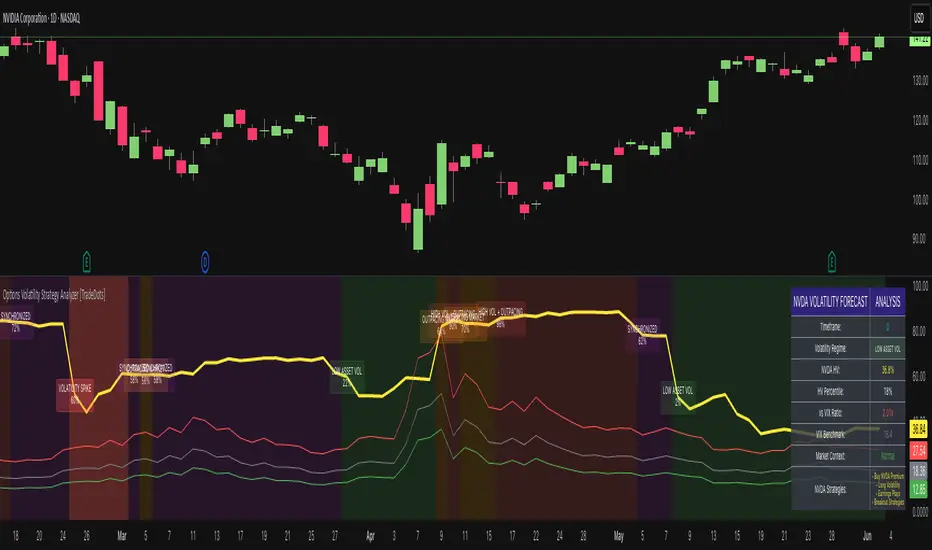
Options Volatility Strategy Analyzer [TradeDots]The Options Volatility Strategy Analyzer is a specialized tool designed to help traders assess market conditions through a detailed examination of historical volatility, market benchmarks, and percentile-based thresholds. By integrating multiple volatility metrics (including VIX and VIX9D) with color-coded regime detection, the script provides users with clear, actionable insights for selecting appropriate options strategies.
📝 HOW IT WORKS
1. Historical Volatility & Percentile Calculations
Annualized Historical Volatility (HV): The script automatically computes the asset’s historical volatility using log returns over a user-defined period. It then annualizes these values based on the chart’s timeframe, helping you understand the asset’s typical volatility profile.
Dynamic Percentile Ranks: To gauge where the current volatility level stands relative to past behavior, historical volatility values are compared against short, medium, and long lookback periods. Tracking these percentile ranks allows you to quickly see if volatility is high or low compared to historical norms.
2. Multi-Market Benchmark Comparison
VIX and VIX9D Integration: The script tracks market volatility through the VIX and VIX9D indices, comparing them to the asset’s historical volatility. This reveals whether the asset’s volatility is outpacing, lagging, or remaining in sync with broader market volatility conditions.
Market Context Analysis: A built-in term-structure check can detect market stress or relative calm by measuring how VIX compares to shorter-dated volatility (VIX9D). This helps you decide if the present environment is risk-prone or relatively stable.
3. Volatility Regime Detection
Color-Coded Background: The analyzer assigns a volatility regime (e.g., “High Asset Vol,” “Low Asset Vol,” “Outpacing Market,” etc.) based on current historical volatility percentile levels and asset vs. market ratios. A color-coded background highlights the regime, enabling traders to quickly interpret the market’s mood.
Alerts on Regime Changes & Spikes: Automated alerts warn you about any significant expansions or contractions in volatility, allowing you to react swiftly in changing conditions.
4. Strategy Forecast Table
Real-Time Strategy Suggestions: At the close of each bar, an on-chart table generates suggested options strategies (e.g., selling premium in high volatility or buying premium in low volatility). These suggestions provide a quick summary of potential tactics suited to the current regime.
Contextual Market Data: The table also displays key statistics, such as VIX levels, asset historical volatility percentile, or ratio comparisons, helping you confirm whether volatility conditions warrant more conservative or more aggressive strategies.
🛠️ HOW TO USE
1. Select Your Timeframe: The script supports multiple timeframes. For short-term trading, intraday charts often reveal faster shifts in volatility. For swing or position trading, daily or weekly charts may be more stable and produce fewer false signals.
2. Check the Volatility Regime: Observe the background color and on-chart labels to identify the current regime (e.g., “HIGH ASSET VOL,” “LOW VOL + LAGGING,” etc.).
3. Review the Forecast Table: The table suggests strategy ideas (e.g., iron condors, long straddles, ratio spreads) depending on whether volatility is elevated, subdued, or spiking. Use these as a starting point for designing trades that match your risk tolerance.
4. Combine with Additional Analysis: For optimal results, confirm signals with your broader trading plan, technical tools (moving averages, price action), and fundamental research. This script is most effective when viewed as one component in a comprehensive decision-making process.
❗️LIMITATIONS
Directional Neutrality: This indicator analyzes volatility environments but does not predict price direction (up/down). Traders must combine with directional analysis for complete strategy selection.
Late or Missed Signals: Since all calculations require a bar to close, sharp intrabar volatility moves may not appear in real-time.
False Positives in Choppy Markets: Rapid changes in percentile ranks or VIX movements can generate conflicting or premature regime shifts.
Data Sensitivity: Accuracy depends on the availability and stability of volatility data. Significant gaps or unusual market conditions may skew results.
Market Correlation Assumptions: The system assumes assets generally correlate with S&P 500 volatility patterns. May be less effective for:
Small-cap stocks with unique volatility drivers
International stocks with different market dynamics
Sector-specific events disconnected from broad market
Cryptocurrency-related assets with independent volatility patterns
RISK DISCLAIMER
Options trading involves substantial risk and is not suitable for all investors. Options strategies can result in significant losses, including the total loss of premium paid. The complexity of options strategies requires thorough understanding of the risks involved.
This indicator provides volatility analysis for educational and informational purposes only and should not be considered as investment advice. Past volatility patterns do not guarantee future performance. Market conditions can change rapidly, and volatility regimes may shift without warning.
No trading system can guarantee profits, and all trading involves the risk of loss. The indicator's regime classifications and strategy suggestions should be used as part of a comprehensive trading plan that includes proper risk management, directional analysis, and consideration of broader market conditions.
Vix_Fix Enhanced MTF [Cometreon]The VIX Fix Enhanced is designed to detect market bottoms and spikes in volatility, helping traders anticipate major reversals with precision. Unlike standard VIX Fix tools, this version allows you to control the standard deviation logic, switch between chart styles, customize visual outputs, and set up advanced alerts — all with no repainting.
🧠 Logic and Calculation
This indicator is based on Larry Williams' VIX Fix and integrates features derived from community requests/advice, such as inverse VIX logic.
It calculates volatility spikes using a customizable standard deviation of the lows and compares it to a moving high to identify potential reversal points.
All moving average logic is based on Cometreon's proprietary library, ensuring accurate and optimized calculations on all 15 moving average types.
🔷 New Features and Improvements
🟩 Custom Visual Styles
Choose how you want your VIX data displayed:
Line
Step Line
Histogram
Area
Column
You can also flip the orientation (bottom-up or top-down), change the source ticker, and tailor the display to match your charting preferences.
🟩 Multi-MA Standard Deviation Calculation
Customize the standard deviation formula by selecting from 15 different moving averages:
SMA (Simple Moving Average)
EMA (Exponential Moving Average)
WMA (Weighted Moving Average)
RMA (Smoothed Moving Average)
HMA (Hull Moving Average)
JMA (Jurik Moving Average)
DEMA (Double Exponential Moving Average)
TEMA (Triple Exponential Moving Average)
LSMA (Least Squares Moving Average)
VWMA (Volume-Weighted Moving Average)
SMMA (Smoothed Moving Average)
KAMA (Kaufman’s Adaptive Moving Average)
ALMA (Arnaud Legoux Moving Average)
FRAMA (Fractal Adaptive Moving Average)
VIDYA (Variable Index Dynamic Average)
This gives you fine control over how volatility is measured and allows tuning the sensitivity for different market conditions.
🟩 Full Control Over Percentile and Deviation Conditions
You can enable or disable lines for standard deviation and percentile conditions, and define whether you want to trigger on over or under levels — adapting the indicator to your exact logic and style.
🟩 Chart Type Selection
You're no longer limited to candlestick charts! Now you can use Vix_Fix with different chart formats, including:
Candlestick
Heikin Ashi
Renko
Kagi
Line Break
Point & Figure
🟩 Multi-Timeframe Compatibility Without Repainting
Use a different timeframe from your chart with confidence. Signals remain stable and do not repaint. Perfect for spotting long-term reversal setups on lower timeframes.
🟩 Alert System Ready
Configure alerts directly from the indicator’s panel when conditions for over/under signals are met. Stay informed without needing to monitor the chart constantly.
🔷 Technical Details and Customizable Inputs
This indicator includes full control over the logic and appearance:
1️⃣ Length Deviation High - Adjusts the lookback period used to calculate the high deviation level of the VIX logic. Shorter values make it more reactive; longer values smooth out the signal.
2️⃣ Ticker - Choose a different chart type for the calculation, including Heikin Ashi, Renko, Kagi, Line Break, and Point & Figure.
3️⃣ Style VIX - Change the visual style (Line, Histogram, Column, etc.), adjust line width, and optionally invert the display (bottom-to-top).
📌 Fill zones for deviation and percentile are active only in Line and Step Line modes
4️⃣ Use Standard Deviation Up / Down - Enable the overbought and oversold zone logic based on upper and lower standard deviation bands.
5️⃣ Different Type MA (for StdDev) - Choose from 15 different moving averages to define the calculation method for standard deviation (SMA, EMA, HMA, JMA, etc.), with dedicated parameters like Phase, Sigma, and Offset for optimized responsiveness.
6️⃣ BB Length & Multiplier - Adjust the period and multiplier for the standard deviation bands, similar to how Bollinger Bands work.
7️⃣ Show StdDev Up / Down Line - Enable or disable the visibility of upper and lower standard deviation boundaries.
8️⃣ Use Percentile & Length High - Activate the percentile-based logic to detect extreme values in historical volatility using a customizable lookback length.
9️⃣ Highest % / Lowest % - Set the high and low percentile thresholds (e.g., 85 for high, 99 for low) that will be used to trigger over/under signals.
🔟 Show High / Low Percentile Line - Toggle the visual display of the percentile boundaries directly on the chart for clearer signal reference.
1️⃣1️⃣ Ticker Settings – Customize parameters for special chart types such as Renko, Heikin Ashi, Kagi, Line Break, and Point & Figure, adjusting reversal, number of lines, ATR length, etc.
1️⃣2️⃣ Timeframe – Enables using SuperTrend on a higher timeframe.
1️⃣3️⃣ Wait for Timeframe Closes -
✅ Enabled – Displays Vix_Fix smoothly with interruptions.
❌ Disabled – Displays Vix_Fix smoothly without interruptions.
☄️ If you find this indicator useful, leave a Boost to support its development!
Every feedback helps to continuously improve the tool, offering an even more effective trading experience. Share your thoughts in the comments! 🚀🔥


Advanced VW SMI w/ Divergence, Confirmations & TableVolume-Weighted SMI with Dynamic Divergence and Confirmation
Description:
This advanced indicator combines the Stochastic Momentum Index (SMI) with volume weighting, dynamic overbought/oversold bands, and robust divergence detection to help you spot true momentum reversals confirmed by volume, trend, and momentum.
Features
Volume-Weighted SMI
The SMI is amplified or dampened based on normalized volume, filtering out low-interest price moves and highlighting those with real conviction.
Dynamic OB/OS Bands
Overbought and oversold levels adapt automatically to current volatility and trend using moving average and standard deviation bands, keeping signals relevant across all market regimes.
Divergence Detection with Visuals
Real-time bullish and bearish divergence signals are drawn right on the SMI line, including lines and labels, making reversal setups easy to spot.
Triple Confirmation
Divergence signals are filtered by:
Volume surge (user adjustable)
RSI extremes (oversold/overbought)
Higher timeframe trend (optional EMA filter)
Customizable Volume Weighting
Adjust how much influence volume has on SMI signals—tune sensitivity to your market and style.
Performance Table
Track bullish/bearish divergence counts in real time.
How to Use
Add to your chart.
(Move to a separate pane for best results.)
Adjust settings to fit your market (lengths, volume power, trend filter, etc.).
Watch for colored SMI moves outside dynamic bands for momentum extremes.
Look for divergences marked by arrows, lines, and labels on the SMI.
Use table count for an overview of signal frequency.
Tips
Works on all timeframes; try adjusting dynamic band length for higher timeframes.
For scalping, lower the SMI and pivot lengths.
For swing trading, enable trend and volume confirmations for higher confidence.
Use with other price action signals for best results.
Created with Pine Script v5.
If you find this helpful, please give it a like or comment!

EMA 12/21 Crossover with ATR-based SL/TPRecommended
ATR Lenght: 7
ATR multiplier for stop loss: 1.5
ATR multiplier for take profit: 2
Recalculate- aftter order is filled: Make sure you put this on if using these settings.
Using standard OHLC: put on.
Theses settings make you 50% win rate with 1.5 profit factor
📈 Ultimate Scalper v2
Strategy Type: Trend-Pullback Scalping
Indicators Used: EMA (12/21), MACD Histogram, ADX, ATR
Platform: TradingView (Pine Script v5)
Author: robinunga16
🎯 Strategy Overview
The Ultimate Scalper v2 is a scalping strategy that catches pullbacks within short-term trends using a dynamic combination of 12/21 EMA bands, MACD Histogram crossovers, and ADX for trend confirmation. It uses ATR-based stop-loss and take-profit levels, making it suitable for volatility-sensitive environments.
🧠 Logic Breakdown
🔍 Trend Detection
Uses the 12 EMA and 21 EMA to identify the short-term trend:
Uptrend: EMA 12 > EMA 21 and ADX > threshold
Downtrend: EMA 12 < EMA 21 and ADX > threshold
The ADX (default: 25) filters out low-momentum environments.
📉 Pullback Identification
Once a trend is detected:
A pullback is flagged when the MACD Histogram moves against the trend (below 0 in uptrend, above 0 in downtrend).
An entry signal is triggered when the histogram crosses back through zero (indicating momentum is resuming in the trend direction).
🟢 Entry Conditions
Long Entry:
EMA 12 > EMA 21
ADX > threshold
MACD Histogram was below 0 and crosses above 0
Short Entry:
EMA 12 < EMA 21
ADX > threshold
MACD Histogram was above 0 and crosses below 0
❌ Exit Logic (ATR-based)
The strategy calculates stop-loss and take-profit levels using ATR at the time of entry:
Stop-Loss: Entry Price −/+ ATR × Multiplier
Take-Profit: Entry Price ± ATR × 2 × Multiplier
Default ATR Multiplier: 1.0
⚙️ Customizable Inputs
ADX Threshold: Minimum trend strength for trades (default: 25)
ATR Multiplier: Controls SL/TP distance (default: 1.0)
📊 Visuals
EMA 12 and EMA 21 band can be added manually for visual reference.
Entry and exit signals are plotted via TradingView’s built-in backtesting engine.
⚠️ Disclaimer
This is a backtesting strategy, not financial advice. Performance varies across markets and timeframes. Always combine with additional confluence or risk management when going live.

VWRSI-ADX-v5.1Volume Weight RSI with ADX calculation. Recommend waiting for VWRSI and VWRSI MA to cross at extreme levels. Use ADX to indicate strength of trend.

EMA 12/21 Crossover with ATR-based SL/TP📈 Ultimate Scalper v2
Strategy Type: Trend-Pullback Scalping
Indicators Used: EMA (12/21), MACD Histogram, ADX, ATR
Platform: TradingView (Pine Script v5)
Author:
🎯 Strategy Overview
The Ultimate Scalper v2 is a scalping strategy that catches pullbacks within short-term trends using a dynamic combination of 12/21 EMA bands, MACD Histogram crossovers, and ADX for trend confirmation. It uses ATR-based stop-loss and take-profit levels, making it suitable for volatility-sensitive environments.
🧠 Logic Breakdown
🔍 Trend Detection
Uses the 12 EMA and 21 EMA to identify the short-term trend:
Uptrend: EMA 12 > EMA 21 and ADX > threshold
Downtrend: EMA 12 < EMA 21 and ADX > threshold
The ADX (default: 25) filters out low-momentum environments.
📉 Pullback Identification
Once a trend is detected:
A pullback is flagged when the MACD Histogram moves against the trend (below 0 in uptrend, above 0 in downtrend).
An entry signal is triggered when the histogram crosses back through zero (indicating momentum is resuming in the trend direction).
🟢 Entry Conditions
Long Entry:
EMA 12 > EMA 21
ADX > threshold
MACD Histogram was below 0 and crosses above 0
Short Entry:
EMA 12 < EMA 21
ADX > threshold
MACD Histogram was above 0 and crosses below 0
❌ Exit Logic (ATR-based)
The strategy calculates stop-loss and take-profit levels using ATR at the time of entry:
Stop-Loss: Entry Price −/+ ATR × Multiplier
Take-Profit: Entry Price ± ATR × 2 × Multiplier
Default ATR Multiplier: 1.0
⚙️ Customizable Inputs
ADX Threshold: Minimum trend strength for trades (default: 25)
ATR Multiplier: Controls SL/TP distance (default: 1.0)
📊 Visuals
EMA 12 and EMA 21 band can be added manually for visual reference.
Entry and exit signals are plotted via TradingView’s built-in backtesting engine.
⚠️ Disclaimer
This is a backtesting strategy, not financial advice. Performance varies across markets and timeframes. Always combine with additional confluence or risk management when going live.

RSI TrendSignal🔍 **Smart RSI System – Free & Open Source**
A powerful RSI-based indicator designed for traders who want clarity, simplicity, and filtered signals that *actually mean something*.
---
### 🎯 Key Features:
✅ Classic RSI with custom smoothing
✅ Optional Bollinger Bands over RSI
✅ Built-in Divergence Detection (Regular Bullish/Bearish)
✅ Dynamic Buy/Sell Conditions based on RSI + MA cross
✅ STAR signals for high-conviction entries (Overbought/Oversold + strength filter)
✅ ATR-based strength filter and custom visualizations
✅ Works great on **crypto**, **forex**, or **indices**
✅ Fully open-source and beginner-friendly!
---
### 📊 Recommended Timeframes:
15min, 1H, 4H, Daily – test and adjust settings for your style.
---
### ⚙️ How to Use:
1. Watch for **Buy/Sell** shapes when RSI confirms crossover with smoothed MA.
2. **STAR signals** are stronger – when RSI is above 70 or below 30 with momentum separation.
3. Divergences (optional) can confirm reversals.
4. Use ATR plot or your own trailing stop logic for exit strategy.
---
🔔 Alerts are built-in and ready to use.
📌 You can connect them to bots, webhooks, or Telegram (see alert templates in the script).
---
🧠 **Built by a trader, for traders.**
Use this as a base and build your own version – or just trade it as is.
---
---
💬 **Feedback / Questions / Want to talk?**
Feel free to message me on Telegram:
👉 (t.me/Ario_pinescript_pogramer)
This is a clean version of RSI TrendSignal with improved alerts.
It uses RSI cross with a smoothed moving average to generate filtered buy/sell signals.
No external links or bots. Fully compliant with TradingView rules.
📺 Demo & Tutorial coming soon on my YouTube channel – stay tuned

RSIBBExtremeMT-ATRv5.1Multi-Tool Indicator:
Trend uses 12/26 ema. 12>26 = Green 12<26 = Red
Multi-timeframe labels for RSI & ATR
Bollinger Band = | (Wait until 1 tick past where the solid line ends)
RSI Oversold = 30- (Customizable) RSI = Oversold then up arrow
RSI Overbought = 70+ (Customizable) RSI = Overbought then down arrow
Tip: Have BB & RSI flag together.

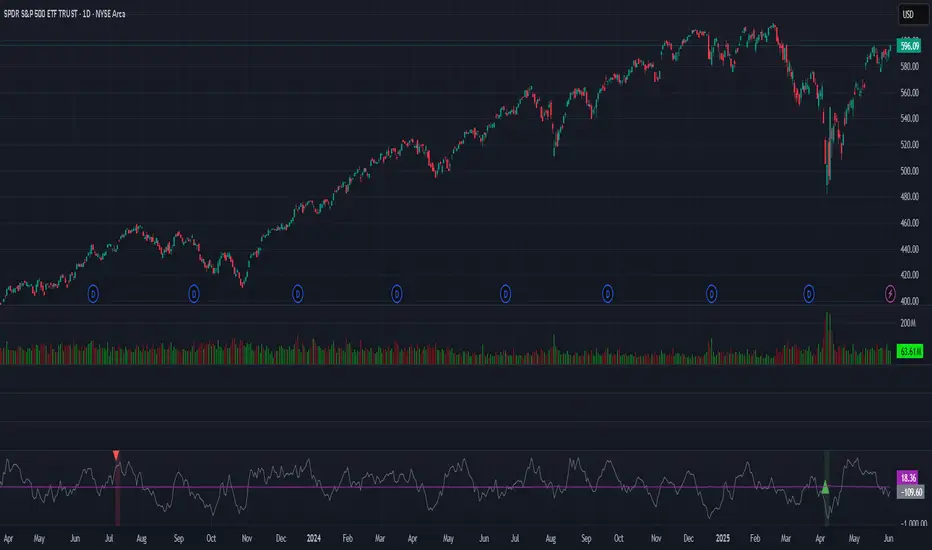
Volatility Tracker (VIX vs Realized)Plots Realized Volatility (historical, blue).
Plots Implied Volatility (VIX) (red).
Shows the spread between VIX and realized vol (gray), helping spot fear premium or complacency.

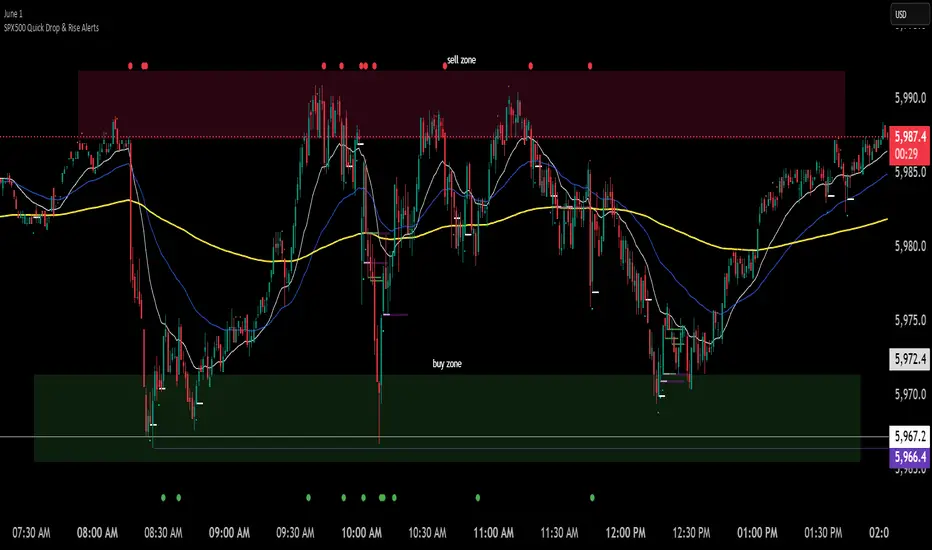
SPX500 Quick Drop & Rise AlertsSimple script thats been adjusted for 1 minute trading on spx500.
It will show you and signal to you:
dropThreshold: how much the price must rise or fall (in percent) to trigger a signal. Default is 0.05 → 5%.
lookbackBars: how many bars back to compare against. Default is 1 (i.e., compare the current close to the previous bar’s close).
Theirs a few ways to use this, you might want to use your MA 238 as a reference point. Use it as a target or a level to bounce or reject from. Then use this indicator to help show you where the market energy is flowing.
Do some backtesting and see what you see. Only use it for New York open times would probably be best.
Youll have to change your mentality depending on if the market is trending / ranging ect of course.
BBS – Bond Breadth Signal"When bonds scream, breadth collapses, and fear spikes — BBS listens."
🧠 BBS – Bond Breadth Signal
A reversal timing tool built on macro conviction, not price noise.
The Bond Breadth Signal (BBS) was developed to identify major market inflection points by combining four key market stress indicators:
1) 10-Year Yield ROC – Measures sharp moves in the bond market
2) Z-Score of the 10Y – Captures statistical extremes
3) NSHF (Net Highs–Lows) – Signals internal market strength or weakness
4) TLT ROC + VIX – Confirmations of flight to safety and volatility-driven fear
When all conditions align, BBS marks either a For-Sure Buy or For-Sure Sell — these are rare, high-confidence signals designed to cut through noise and focus on true market dislocations.
🔧 Features:
-Background color and signal arrows on confirmation days
-Signals remain visually active for 3 days for added clarity
-Fully adjustable thresholds and alert toggles
-Plot panel for yield, TLT, NSHF, VIX, and Z-score visuals
This tool isn’t designed to fire every day. It’s meant to wait for those moments when the market truly bends — not just wiggles.
Best used on major indices (SPY, QQQ, IWM) to assess macro turning points.
Volatility Break + Trend Bias Scalper [Enhanced Visuals]Volatility Break + Trend Bias Scalper \
Overview
This strategy is designed to help traders catch high-probability breakout moves by combining real-time volatility surges with higher timeframe trend confirmation. It is particularly useful in markets like AAPL, BTC, NASDAQ, and Forex pairs where volatility and momentum often occur in bursts.
📈 Strategy Logic
🎯 1. Volatility Spike Detection
The core entry trigger is based on identifying sudden ATR-based volatility bursts:
* ATR(7) is compared to its EMA(14) smoothing.
* A volatility spike is confirmed when ATR exceeds `1.5x` the smoothed ATR.
This helps avoid entering during sideways price action and focuses only on explosive breakouts.
🧭 2. Higher Timeframe Trend Filter
To improve signal quality, the strategy checks the EMA(200) slope from a higher timeframe (e.g., 15min while trading on 3/5/45min charts):
* Bullish trend: EMA rising
* Bearish trend: EMA falling
This ensures we only trade in the direction of larger momentum.
🧠 3. Structure Break Entry
A simple but effective price action confirmation:
* Long: Close > highest close of the last 2 candles
* Short: Close < lowest close of the last 2 candles
This avoids "fake" moves and choppy zones.
🎛️ 4. Risk/Reward and Exit Logic
* Take Profit (TP) = 1.5× ATR (configurable)
* Stop Loss (SL) = 1.0× ATR (configurable)
* You can adjust this for more aggressive or conservative setups.
✅ All exits are calculated dynamically using the current ATR at trade entry.
🖥️ Visual Enhancements
This version includes:
✅ Signal markers (🔴 for Short, 🟢 for Long)
✅ Trend-colored background zones
✅ TP/SL lines drawn on chart
✅ Toggle options to enable/disable labels and TP/SL lines
These visuals help traders quickly validate signals, backtest more effectively, and share setups with clarity.
🧪 Backtest Settings
* Position Size: 1% of equity
* Commission: 0
* Slippage: Assumed minimal
* Recommended Markets: AAPL (45m), BTCUSD (5m–15m), NAS100 (15m), EUR/USD (5m)
> You can tune the strategy further using `PineScriptsAI`.
⚠️ Disclaimer
This strategy is for **educational purposes only**. It does **not constitute financial advice** or guarantees of profitability. Backtest results may vary across assets, timeframes, and market conditions.
Always validate with forward testing and sound risk management.
🔗 Built With Help From PineScriptsAI
Want to build your own version or add:
* Time filters (e.g., NY or London session)?
* Multi-take-profits or trailing stop?
* Auto alert bots to Telegram/Discord?

Institutional Intraday Master (No Loops)📊 Institutional Intraday Master Indicator: How-To Guide for New Traders
1. What Does This Indicator Do?
The Institutional Intraday Master is a custom TradingView script that helps you:
• Spot when big institutions (like hedge funds) might be buying or selling.
• Identify important price levels based on recent trading activity.
• Get clear buy (“INST LONG”) and sell (“INST SHORT”) signals.
• Manage risk with automatic stop (invalidation) signals.
2. Key Acronyms & Terms
Acronym Meaning
RSI Relative Strength Index (momentum measure)
POC Point of Control (price with most volume)
VAH Value Area High (top of high-volume zone)
VAL Value Area Low (bottom of high-volume zone)
ATR Average True Range (volatility measure)
MACD Moving Average Convergence Divergence
3. How to Add the Script to TradingView
1. Copy the full Pine Script code (see previous answer).
2. Open TradingView and go to the chart of your chosen stock or ETF (e.g., SPY, AAPL).
3. Click Pine Editor at the bottom of the screen.
4. Paste the code into the editor.
5. Click Add to Chart (or “Save” then “Add to Chart”).
6. The indicator will appear on your chart with colored backgrounds, lines, and buy/sell signals.
4. What Do the Visuals Mean?
• Green Background:
Institutions are likely buying (bullish bias).
• Red Background:
Institutions are likely selling (bearish bias).
• Purple Dots (POC):
The price where the most volume traded in the last 30 bars (often a “magnet” for price).
• Gray Lines (VAH/VAL):
The top and bottom of the high-volume area—think of these as “fair value” boundaries.
• Blue Lines:
Recent breakout levels (upper = bullish breakout, lower = bearish breakout).
• Green “INST LONG” Label:
Suggested buy (long) entry.
• Red “INST SHORT” Label:
Suggested sell (short) entry.
5. How to Use for Day Trading
A. Setup
• Use a 5-minute or 15-minute chart for intraday trading.
• The indicator will automatically update key levels and signals.
B. Entry Signals
• Buy (Long):
• When you see a green “INST LONG” label, and the background is green.
• Example: Price breaks above the blue upper band with strong volume.
• Sell (Short):
• When you see a red “INST SHORT” label, and the background is red.
• Example: Price breaks below the blue lower band with strong volume.
C. Risk Management
• The script uses ATR (Average True Range) to suggest stop-loss distances.
• Stop out (invalidation):
• If you’re long and price closes below the gray VAL line or drops by more than 1 ATR from the last low, consider exiting.
• If you’re short and price closes above the gray VAH line or rises by more than 1 ATR from the last high, consider exiting.
D. Take Profit
• Consider taking profit at the next major volume level (POC, VAH/VAL) or when a reversal signal appears.
6. Example Trade
Let’s say you’re trading SPY on a 5-minute chart:
• The background turns green, and a green “INST LONG” label appears at $590.
• The purple POC dot is at $592, and the gray VAH is at $593.
• Trade Plan:
• Enter long at $590.
• Set a stop-loss at $588 (2 ATR below entry).
• Target $592 (POC) or $593 (VAH) for profit.
If price reaches $592 and starts to stall, you might take profit. If price falls to $588, you exit for a small loss.
7. Keys to Watch for Invalidation
• Invalidation means your trade setup is no longer valid.
• For longs:
• Price closes below VAL or makes a new low by more than 1 ATR.
• For shorts:
• Price closes above VAH or makes a new high by more than 1 ATR.
• Always honor your stop-loss!
8. Tips for Success
• Don’t trade every signal. Wait for confirmation (e.g., strong volume, trend in your favor).
• Practice on a simulator before using real money.
• Adjust settings (like ATR multiplier or volume profile length) to fit your style and the asset’s volatility.
9. Illustration Key
• ! ( i.imgur.com background = institutional buying, purple dot = POC, blue line = breakout, green label = buy signal.*
10. Summary Table
Visual/Signal Meaning What To Do
Green background Institutional buying Favor long trades
Red background Institutional selling Favor short trades
Purple dot (POC) Volume magnet/target Use as profit/entry/exit level
Blue line Breakout level Watch for breakouts
Green label Buy (long) signal Consider entering long
Red label Sell (short) signal Consider entering short
Gray lines (VAH/VAL) Value area boundaries Use for stops and targets

System 0530 - Stoch RSI 指标 (带ATR)Indicator Overview: System 0530 - Stoch RSI Signals (ATR Filtered)
This indicator displays potential long and short signals directly on your chart. It combines a dual-timeframe Stochastic RSI analysis (using the current chart timeframe and the 15-minute timeframe) with an ATR (Average True Range) volatility filter.
Signal Logic:
Initial Trigger: Based on Stochastic RSI crossovers and overbought/oversold levels on the current chart timeframe (e.g., 5-minute).
Confirmation: Seeks further confirmation from the 15-minute Stochastic RSI.
ATR Filter: An optional ATR filter helps ensure signals are considered only when market volatility is deemed sufficient.
Signal Cooldown: Prevents too many signals of the same direction in rapid succession.
Display:
Long Signals: Marked with a green upward triangle below the price bar.
Short Signals: Marked with a red downward triangle above the price bar.
Purpose: Designed to assist traders in identifying potential entry points based on Stochastic RSI conditions and market volatility. Users can adjust various parameters to suit different instruments and trading strategies.


System 0530 - Stoch RSI Strategy with ATR filterStrategy Description: System 0530 - Multi-Timeframe Stochastic RSI with ATR Filter
Overview:
This strategy, "System 0530," is designed to identify trading opportunities by leveraging the Stochastic RSI indicator across two different timeframes: a shorter timeframe for initial signal triggers (assumed to be the chart's current timeframe, e.g., 5-minute) and a longer timeframe (15-minute) for signal confirmation. It incorporates an ATR (Average True Range) filter to help ensure trades are taken during periods of adequate market volatility and includes a cooldown mechanism to prevent rapid, successive signals in the same direction. Trade exits are primarily handled by reversing signals.
How It Works:
1. Signal Initiation (e.g., 5-Minute Timeframe):
Long Signal Wait: A potential long entry is considered when the 5-minute Stochastic RSI %K line crosses above its %D line, AND the %K value at the time of the cross is at or below a user-defined oversold level (default: 30).
Short Signal Wait: A potential short entry is considered when the 5-minute Stochastic RSI %K line crosses below its %D line, AND the %K value at the time of the cross is at or above a user-defined overbought level (default: 70). When these conditions are met, the strategy enters a "waiting state" for confirmation from the 15-minute timeframe.
2. Signal Confirmation (15-Minute Timeframe):
Once in a waiting state, the strategy looks for confirmation on the 15-minute Stochastic RSI within a user-defined number of 5-minute bars (wait_window_5min_bars, default: 5 bars).
Long Confirmation:
The 15-minute Stochastic RSI %K must be greater than or equal to its %D line.
The 15-minute Stochastic RSI %K value must be below a user-defined threshold (stoch_15min_long_entry_level, default: 40).
Short Confirmation:
The 15-minute Stochastic RSI %K must be less than or equal to its %D line.
The 15-minute Stochastic RSI %K value must be above a user-defined threshold (stoch_15min_short_entry_level, default: 60).
3. Filters:
ATR Volatility Filter: If enabled, trades are only confirmed if the current ATR value (converted to ticks) is above a user-defined minimum threshold (min_atr_value_ticks). This helps to avoid taking signals during periods of very low market volatility. If the ATR condition is not met, the strategy continues to wait for the condition to be met within the confirmation window, provided other conditions still hold.
Signal Cooldown Filter: If enabled, after a signal is generated, the strategy will wait for a minimum number of bars (min_bars_between_signals) before allowing another signal in the same direction. This aims to reduce overtrading.
4. Entry and Exit Logic:
Entry: A strategy.entry() order is placed when all trigger, confirmation, and filter conditions are met.
Exit: This strategy primarily uses reversing signals for exits. For example, if a long position is open, a confirmed short signal will close the long position and open a new short position. There are no explicit take profit or stop loss orders programmed into this version of the script.
Key User-Adjustable Parameters:
Stochastic RSI Parameters: RSI Length, Stochastic RSI Length, %K Smoothing, %D Smoothing.
Signal Trigger & Confirmation:
5-minute %K trigger levels for long and short.
15-minute %K confirmation thresholds for long and short.
Wait window (in 5-minute bars) for 15-minute confirmation.
Filters:
Enable/disable and configure the Signal Cooldown filter (minimum bars between signals).
Enable/disable and configure the ATR Volatility filter (ATR period, minimum ATR value in ticks).
Strategy Parameters:
Leverage Multiplier (Note: This primarily affects theoretical position sizing for backtesting calculations in TradingView and does not simulate actual leveraged trading risks).
Recommendations for Users:
Thorough Backtesting: Test this strategy extensively on historical data for the instruments and timeframes you intend to trade.
Parameter Optimization: Experiment with different parameter settings to find what works best for your trading style and chosen markets. The default values are starting points and may not be optimal for all conditions.
Understand the Logic: Ensure you understand how each component (Stochastic RSI on different timeframes, ATR filter, cooldown) interacts to generate signals.
Risk Management: Since this version does not include explicit stop-loss orders, ensure you have a clear risk management plan in place if trading this strategy live. You might consider manually adding stop-loss orders through your broker or using TradingView's separate strategy order settings for stop-loss if applicable.
Disclaimer:
This strategy description is for informational purposes only and does not constitute financial advice. Past performance is not indicative of future results. Trading involves significant risk of loss. Always do your own research and understand the risks before trading.

RS: FootprintRS: Footprint (Enhanced by MILO888, original by RunStrat)
This indicator is a modified and optimized version of the original “RS: Footprint” script by RunStrat, further developed by MILO888 for advanced real-time scalping and orderflow visualization.
Key Enhancements by MILO888:
Improved real-time label management and color logic for better chart clarity.
Additional filtering and visualization settings for modern scalping.
Performance optimizations for high-tick environments.
Fully customizable style and label options.
Original algorithm and orderflow engine by RunStrat. MILO888 version adds extra flexibility, advanced color bands, pro-style label pooling, and user-driven settings.
How to Use:
Select your preferred mode, set tick step and thresholds, and observe live footprint updates for advanced orderflow trading.
Credits:
Original Script: © RunStrat
Enhanced & Maintained by: MILO888
Headline
RS: Footprint Chart (Delta | Bid vs Ask) – Visual Orderflow Mastery for Pro Scalpers
RS: Footprint provides real-time, tick-by-tick order flow visualization directly on your price chart. Designed for professional scalpers and day traders, this indicator plots per-price Bid/Ask volume, Delta, and total traded volume at each price step (customizable by tick size).
Key Features:
Mode Selection: Toggle between Delta mode (net difference at price) or Bid vs Ask mode (split side-by-side) for full orderflow insight.
Dynamic Label Filtering: Hide minor prints – only show volume/delta labels above your custom threshold.
Pro Color Coding: Highlight aggressive buyers/sellers, including custom color bands for fast visual recognition.
Ultra-Fast Rendering: Optimized for real-time scalping, no lag—even on fast markets.
Flexible Label Sizing: Scale label size for any screen or zoom.
Automatic Data Pooling: No label clutter—uses smart pooling, only visible at meaningful price levels.
Professional-Grade Visualization: See the actual "footprint" of buying/selling pressure at each price.
Wick & Candle Rendering: Optionally overlays clean custom candle/wick styling for max chart readability.
Ideal for:
Scalping NASDAQ/ES Futures, FX, and Crypto orderflow
Identifying absorption, imbalance, and reversal signals in real-time
Visual confirmation of market structure and volume shifts at each tick
How to Use:
Select your preferred mode (Delta or Bid vs Ask).
Adjust Tick Size and Min Display Value for your market.
Observe volume footprints update in real-time as the market trades.
Use the color coding and volume dominance to spot liquidity events and potential reversals.
Combine with other price action or liquidity indicators for the ultimate orderflow edge.
Note: Real tick-accuracy requires premium/real-time data on TradingView. Works best on 1-min or range charts with high tick frequency.
