Forex Dynamic Momentum Reversal (FDMR) - AlternativeRed and green dashed lines on the last bar represent the upper and lower volatility bands, extending from the previous bar.
Blue and orange labels on the last bar show the fast and slow EMA values.
Green triangles below bars indicate buy signals; red triangles above bars indicate sell signals.
Enable Alerts: Set up alerts in TradingView for buy/sell signals.
Indicators and strategies

YAS V1This advanced "All-in-One" indicator combines the most powerful smart money concepts (SMC), order blocks (OB), fair value gaps (FVG), support & resistance (SR), and liquidity voids, along with entry signals based on EMA and RSI filters.
💡 Key Features:
✅ Order Blocks (OB):
Highlights potential bullish and bearish order blocks to identify strong institutional zones where price might reverse.
✅ Fair Value Gaps (FVG):
Marks price gaps that indicate imbalance and possible zones for retracement or continuation.
✅ Support & Resistance (SR):
Automatically plots dynamic support and resistance levels using pivots, helping you to spot key reaction areas.
✅ Liquidity Voids:
Visualizes potential liquidity gaps or low-volume areas that can act as price magnets.
✅ Buy & Sell Signals:
Generates dynamic BUY and SELL signals based on a combination of EMA trend filters and RSI overbought/oversold levels.
✅ Fully Configurable:
Choose which features to display (OB, FVG, SR, Liquidity Voids, signals).
Adjust EMA and RSI settings to match your strategy.
Control the number of signals (reduce or increase) using a signal sensitivity filter.
⚙️ How it Works:
Trend Filter (EMA):
Price above EMA confirms a bullish environment, below EMA confirms bearish.
RSI Filter:
Signals are validated with RSI to avoid overtrading in ranging markets.
Zones & Gaps:
Institutional concepts (order blocks, gaps) help traders understand supply/demand and price inefficiencies.
🎯 Usage:
Perfect for:
Scalpers looking for intraday turning points.
Swing traders spotting high-probability levels.
Anyone interested in smart money concepts.
🚨 Alerts:
Includes built-in alerts for both BUY and SELL signals so you can react instantly without watching the screen all the time.
💬 Note:
This is a beta version designed to be improved with community feedback. Use it as a guide, and always confirm signals with your own analysis and risk management.
🔥 Ready to take your trading to the next level? Add this indicator to your chart, customize the settings, and start seeing the market like smart money!

High Accuracy Volume Breakout StrategyHigh Accuracy Volume Breakout Strategy (EMA + RSI Filter)
🧠 Description:
This is a high-accuracy breakout strategy based on volume surges, trend confirmation, and momentum filtering, designed for intraday and short-term trading.
The strategy aims to capture strong directional moves triggered by sudden increases in volume, with entry filters to avoid low-quality or choppy signals.
✅ Entry Logic:
🔺 Buy Entry Conditions:
Current candle closes above previous high
Volume is greater than 1.5× the 20-period average
Price is above 50 EMA (uptrend confirmation)
RSI is below 70 (not overbought)
🔻 Sell Entry Conditions:
Current candle closes below previous low
Volume is greater than 1.5× the 20-period average
Price is below 50 EMA (downtrend confirmation)
RSI is above 30 (not oversold)
🎯 Exit Logic:
Stop Loss: 1.2 × ATR(14)
Take Profit: 2.0 × ATR(14)
🧪 Recommended Settings:
Parameter Value
Timeframe 5-minute, 15-minute
Markets Gold (XAUUSD), Nifty, BankNifty, BTC, NASDAQ
Risk/Reward ~1:1.6
Expected Accuracy ~65–75% in trending markets
📊 Features:
🔸 ATR-based dynamic stoploss and target
🔸 Volume spike confirmation to detect real breakouts
🔸 EMA 50 trend filter to reduce false signals
🔸 RSI filter to avoid extreme zones (overbought/oversold)
🔸 Plotted buy/sell arrows for clarity
⚠️ Disclaimer:
This strategy is for educational purposes only. Please backtest and paper trade before using in live markets. Performance may vary depending on asset and timefram
plot(ema50, color=color.orange)

Rob Hoffman IRB Strategy by SniffDog30 Min Bonk Strategy. Not sure if this is beneficial for other tokens/coins. Use at you own risk.
Good strategy for starter in Rob Hoffman style of indicators.
NOTE:
1) Switch to 30 mins
2) adjust to your exchange and quantity of trade

High-Low Range % – poslední 2 periodyHere’s a ready-to-use **English description** for publishing your script on TradingView:
---
## 📈 **High-Low Range % – Last 2 Periods**
This indicator calculates and visualizes the **percentage range** between the **High and Low** of the last **two closed periods** (daily, weekly, or monthly – user selectable).
### 🔍 Features:
* Displays the **High–Low range in %** for each of the **two most recent completed candles**.
* **Highlights** the range label if it exceeds a user-defined threshold (e.g., 10%).
* Allows switching between **daily, weekly, or monthly** timeframe bases.
* User controls for:
* Range threshold
* Label color (normal and highlighted)
* Label text size
* Vertical label offset above the High
### ⚙️ Inputs:
* **Timeframe**: Select between `"D"`, `"W"`, or `"M"` to define the range period.
* **Threshold (%)**: If the range exceeds this value, the label changes color.
* **Highlight Color**: Color for ranges above the threshold.
* **Normal Color**: Color for ranges below the threshold.
* **Text Size**: Tiny → Huge label size.
* **Offset**: Distance in ticks to place the label above the period's High.
### 🖼 Visual Output:
* A label placed **just above the High** of the respective candle.
* High and Low levels of the selected period are plotted as horizontal lines.
* Only the **two most recent closed periods** are displayed to keep the chart clean.
---
Let me know if you'd also like a **screenshot description** or **tags** for publication (e.g., `volatility`, `range`, `BTC`, `weekly`, etc.).

15-Minute King (VWAP + Z-Score + CVD Oscillator)fridrich instituational secret . ( limited time only 4 free )

Simple ## User Guide for the Simple
I. Indicator Philosophy
This indicator is not a simple system that provides only one type of signal. It is an advanced tool that analyzes the market using three independent "engines," each specializing in detecting a different type of trading opportunity. Its goal is to identify high-probability setups by filtering out market noise.
II. Legend – What You See on the Chart
Before we proceed to the signals, you need to understand what each visual element represents:
Orange Line (200 EMA): This is the main, long-term trend indicator. It acts like a river – if the price flows above it, we look for buying opportunities (LONG). If it's below, we look for selling opportunities (SHORT).
The Ribbon (green/red): Represents short-term momentum and acts as a dynamic support/resistance zone. A green ribbon suggests buying strength, while a red one suggests selling pressure.
Kijun-sen Line (blue/red): This is the medium-term "center of gravity" of the market. It shows the price equilibrium. Its position relative to the price and the ribbon is crucial for many signals.
Gray Background: This is a "NO-TRADE ZONE." It appears when the ADX indicator shows that the market is in consolidation and lacks a clear trend. Most signals are ignored in these areas.
## III. The Three Signal Engines – When to Consider a Position
The indicator generates three different types of signals, each with its own characteristics and risk profile.
1. LONG / SHORT Labels (The Pullback Engine - Conservative)
Character: Safe, conservative, trend-following. Appears the least frequently.
How it works: It looks for ideal, "textbook" conditions. For a LONG signal, all indicators must be in full alignment (price > ribbon > Kijun > orange line), the trend must be strong (high ADX), AND the price must make a pullback to the ribbon and then bounce off it.
When to consider a position: When you see this signal, you are entering a well-developed, healthy trend. It's a high-probability entry, but often not at the very beginning of the move. Ideal for traders who value safety.
2. 🔵 / 🟣 Circles (The Squeeze Engine - Moderate)
Character: Moderately aggressive, looks for the beginning of a new, dynamic move.
How it works: It searches for periods of consolidation and low volatility (when the market is "gathering energy"). The signal (a circle) appears at the moment the price breaks out of this consolidation, and the direction of the breakout is confirmed by the Kijun-sen line.
When to consider a position: When you see the price has been moving sideways for a while, and then a circle appears. This is a sign that the consolidation phase has likely ended and a new impulse is beginning. Ideal for catching "fresh" moves.
3. ⚡ Lightning Bolt (The Reversal Engine - Aggressive)
Character: Aggressive, contrarian, attempts to catch sharp reversals. This is the riskiest signal.
How it works: It ignores most of the trend filters. Its sole purpose is to find a moment where the price, after a sharp and overextended move in one direction, suddenly reverses on a strong candle with high volume.
When to consider a position: When you want to take a risk to catch the very bottom (V-bottom) or top (V-top). This signal requires the most experience. It is recommended to only take it when it appears near a significant, horizontal support or resistance level. Never take it "in a vacuum."
IV. Summary and Practical Strategy
Signal
Signal Type
Character
Ideal Market Conditions
LONG/SHORT
Pullback Entry
Conservative
A strong, developed, and healthy trend.
🔵/🟣
Squeeze Breakout
Moderate
The end of a sideways move, the beginning of a new impulse.
⚡
Sharp Reversal
Aggressive
Market panic, oversold/overbought conditions at a key S/R level.
Eksportuj do Arkuszy

Volume Shelf Breakout WatcherThis indicator detects potential breakout opportunities from high-volume price shelves (HVNs) using a custom volume profile engine. It scans the past 100 bars (adjustable) to identify price ranges with heavy volume accumulation, then monitors for a breakout when price is near the top of that range.
To increase accuracy, it optionally confirms momentum using:
✅ MACD bullish crossover
✅ RSI > 55
✅ Volume spike above 20-bar average
When all enabled conditions are met, the indicator highlights the bar with a green label and background shading, and can trigger alerts for trade setups.
Use this indicator to:
Identify volume-based consolidation zones
Anticipate price surges through low-volume areas ("volume gaps")
Catch breakouts with momentum confirmation
Inputs:
Volume Profile Range (bars)
HVN Sensitivity (top % of volume)
MACD confirmation toggle
RSI level toggle
Volume spike toggle
Ideal for:
Traders looking to enter early on momentum moves as price escapes compression zones into areas of less resistance.

FVG + RSI Sweep M15FVG + RSI Sweep M15 – Smart Liquidity Trading Indicator
This indicator is designed for high-probability intraday trading, optimized for the 15-minute timeframe (M15). It combines:
Fair Value Gap (FVG) detection – reveals price imbalance zones
RSI reversal signals – identifies overbought/oversold exhaustion
Liquidity sweep logic – confirms fakeouts beyond recent highs/lows
Time filter – focuses only on high-volume London & New York sessions
When all conditions align, it generates clean Buy/Sell signals, with automatic TP and SL levels based on risk–reward logic. Ideal for traders seeking 1–2 precise trades per day with minimal noise.

WRAMA Channel (Weighted RSI ATR MA)OVERVIEW
The WRAMA Channel (Weighted RSI ATR MA) is an advanced technical analysis tool designed to react more quickly to price movements compared to indicators using conventional moving averages. It combines the Relative Strength Index (RSI), Average True Range (ATR), and a weighted moving average, resulting in the WRAMA. This indicator forms a dynamic price channel based on a weighted average that incorporates both trend strength (via RSI) and market volatility (via ATR). It helps traders identify trends, potential reversals, and breakout signals, while offering broad customization options.
Key Features
WRAMA Price Channel:
Generates a dynamic channel around the weighted moving average (WRAMA), adapting to market volatility and momentum, similar to Bollinger Bands. Users are encouraged to adjust channel width and length according to their strategy.
The upper and lower channel bands are calculated based on a percentage deviation from the baseline line.
The channel fill color changes depending on the price's position relative to the baseline (green above, red below), with an optional gradient for better visualization.
Weighted Moving Average (WRAMA):
WRAMA is a custom weighted moving average (MA1), where closing prices are weighted based on RSI and ATR, allowing it to dynamically adapt to market conditions.
Baseline: The WRAMA line calculated over a user-defined period.
WRAMA Calculation:
RSI Weight: Based on RSI value. When RSI is in extreme zones (below the lower threshold or above the upper threshold), an extreme weight is applied. Otherwise, the weight is based on the squared RSI value divided by 100, raised to a power defined by the rsi_weight_factor.
ATR Weight: Based on the ATR-to-average-ATR ratio. If ATR exceeds a threshold (atr_threshold × avg_atr), an extreme weight is applied. Otherwise, the weight is based on the squared ratio of ATR to average ATR, raised to the power of the atr_weight_factor.
Combined Weight: RSI and ATR weights are combined using a rsi_atr_balance parameter. Final weight = RSI weight × balance + ATR weight × (1 - balance).
WRAMA Calculation: The closing price is multiplied by the combined weight. The result is averaged over the ma_length period and divided by the average of the weights, forming the WRAMA line. For current WRAMA (ma_length = 1), the calculation simplifies to a single weighted price.
Additional Moving Averages:
For additional confirmations, the indicator supports up to five moving averages (MA1–MA5) with various types (SMA, EMA, WMA, HMA, ALMA) and customizable periods.
All additional MAs are calculated based on WRAMA or its baseline, ensuring consistency and enabling deeper analysis within a unified methodology. MA trend directions can be tracked in a built-in signal table.
Trading Signals:
Breakout Signals: Breakouts above/below the channel are optionally marked with triangle shapes (green for bullish, red for bearish).
MA Signals: Price position relative to MAs or their slope generates bullish/bearish signals. These are optionally visualized with default triangles (green up, red down).
A signal table in the top-right corner summarizes the status of each moving average – bullish, bearish, or neutral.
Customization Options
Channel Settings:
MA Period: Length of the WRAMA baseline (default: 100).
Channel Deviation : Percentage offset from the baseline for upper/lower bands (default: 1.5%).
RSI Settings:
RSI Period: Length of the RSI calculation (default: 14).
RSI Upper/Lower Threshold: Overbought/oversold levels (default: 70/30).
RSI Weight Factor: Influence of RSI on weighting (default: 2.0).
ATR Settings:
ATR Period: ATR calculation length (default: 14).
ATR Threshold: Volatility threshold as a multiple of average ATR (default: 1.5).
ATR Weight Factor: Influence of ATR on weighting (default: 2.0).
RSI & ATR Combined:
Extreme Weight: Weight applied in extreme RSI/ATR conditions (default: 3.0).
RSI/ATR Balance: Balance between RSI and ATR influence (default: 0.5).
Signal Settings:
Show Breakout Signals: Enable/disable breakout triangles.
Show MA Signals: Enable/disable MA-based signals.
MA Signal Source: Choose between current WRAMA or baseline.
MA Signal Analysis: Based on price position or slope.
Neutral Threshold : Minimum distance from MA for signal neutrality (default: 0.5%).
Minimum MA Slope : Minimum slope for trend direction signals (default: 0.01%).
Moving Averages (MA1–MA5):
Options to enable/disable, select type (SMA, EMA, WMA, HMA, ALMA), set period length, and choose color.
Style Settings:
Gradient Fill: Enable/disable gradient coloring within the channel.
Show Baseline: Enable/disable WRAMA baseline visibility.
Colors: Customize line, fill, and signal colors.
Use Cases
Trend Identification: The WRAMA channel highlights trend direction and potential reversal zones when price contacts the channel edges.
Breakout Signals: Channel breakouts may indicate trend shifts or momentum surges.
MA Analysis: The signal table provides a clear summary of market direction (bullish, bearish, or neutral) based on selected moving averages.
Trading Strategies: Suitable for trend-following, mean-reversion, and scalping strategies, depending on user preferences and settings.
Notes
The indicator offers a high degree of flexibility, making it adaptable to various trading styles, instruments, and timeframes.
It is recommended to adjust channel length and width to fit your trading strategy.
Backtesting settings on historical data is advised to optimize parameters for a specific strategy and market.

EMAs 60/125/250 + Swing-Struktur + CCI-AlertsEMAs 60/125/250 + Swing-Points + CCI-Alerts / crossover 100 /-100

Price Action Breakout – CALL/PUT AlertsThis strategy generates CALL or PUT alerts based on price breakouts confirmed by EMA and volume filters.
🔍 Breakout Logic
📈 CALL Alert (Bullish Breakout):
Price closes above EMA
Price breaks above previous high
Volume is above average × multiplier
📉 PUT Alert (Bearish Breakout):
Price closes below EMA
Price breaks below previous low
Volume is above average × multiplier
🎯 Alert Structure
CALL 📈 / PUT 📉
Entry Price
Take Profit (TP) – Based on risk/reward ratio
Stop Loss (SL) – Based on percentage distance from entry
📊 Chart Elements
Labels on breakout candle with full alert info
Horizontal lines for TP and SL levels
Works on any timeframe (e.g., 15min for intraday)
✅ Use Case
Ideal for options traders, scalpers, and automated alerts

Relative StrengthDescription:
This indicator provides a simplified yet powerful method for measuring a stock's momentum based on its proximity to its recent high. It is a direct implementation of a trading concept discussed in a lecture from the New York Institute of Finance.
Core Concept
The underlying theory, supported by academic research, is that a stock making a new high is one of the most bullish signals possible. Such stocks have a statistical tendency to continue making new highs in the near term.
Instead of requiring complex relative strength calculations against a universe of stocks, this indicator uses a simple and elegant ratio to act as a proxy for momentum:
Indicator Value = Current Close / Highest High of Lookback Period
A value approaching 1.0 indicates the stock is strong and nearing a new high. A value at 1.0 means a new high has just been made.
How to Use This Indicator
The indicator consists of two primary components:
RS Line (Teal): The core momentum calculation (Close / High).
Signal MA (Orange): A moving average of the NHRS Line, which acts as the trigger for signals.
The signals are generated based on the crossover between these two lines:
BUY Signal: When the RS Line crosses ABOVE its moving average. This suggests that short-term momentum is accelerating and a new uptrend may be starting. The background will turn green.
SELL Signal: When the RS Line crosses BELOW its moving average. This indicates that momentum is fading and it may be prudent to exit the position to avoid a decline. The background will turn red.
Indicator Settings
You can customize the indicator to fit your trading style and the timeframe you are analyzing:
High Lookback Period: Choose the period for the "Highest High" calculation. Options range from 1 Month to 12 Months (52 weeks), allowing you to measure short-term or long-term strength.
Moving Average Length: Adjust the length of the signal line's moving average. The lecturer defaults to 26 weeks for a six-month view.
Moving Average Type: Select the type of moving average for the signal line (SMA, EMA, WMA, HMA).
Credits and Inspiration
Proper credit is essential. This script is a practical application of a concept that builds upon foundational academic work.
The core idea that a stock's proximity to its 52-week high is an investable anomaly was detailed in the 2004 Journal of Finance paper:
"The 52 Week High and Momentum Investing" by Thomas J. George and Chuan-Yang Hwang.
The lecturer's contribution, which this script implements, was to simplify this concept into an actionable trading tool by applying a moving average crossover to generate clear and objective buy and sell signals.
Disclaimer: This tool is for educational and informational purposes only. It is not financial advice. All trading involves risk, and you should always perform your own research and backtesting before making any trading decisions.

VWMA + ML RSI StrategyVWMA + ML RSI Strategy
This strategy combines the power of Volume-Weighted Moving Average (VWMA) with a Machine Learning-enhanced RSI to generate high-probability long entries.
✅ Buy Logic:
A buy signal is triggered when:
The candle closes above the VWMA
The ML RSI (smoothed using advanced moving averages) is above 60
If only one of the above conditions is met, the strategy waits for the second to confirm before entering.
❌ Sell Logic:
The position is closed when:
The candle closes below the VWMA, and
The ML RSI falls below 40
🎯 Risk Management:
Take Profit: 1.5% above entry
Stop Loss: 1.5% below entry
🤖 ML RSI Explanation:
The ML RSI is a refined version of the traditional RSI using smoothing techniques (like ALMA, EMA, etc.) to reduce noise and enhance responsiveness to price action. It helps filter out weak signals and improves trend confirmation.
🔧 Customization:
Adjustable VWMA length
Configurable ML RSI smoothing method, length, and ALMA sigma
Thresholds for entry/exit RSI levels

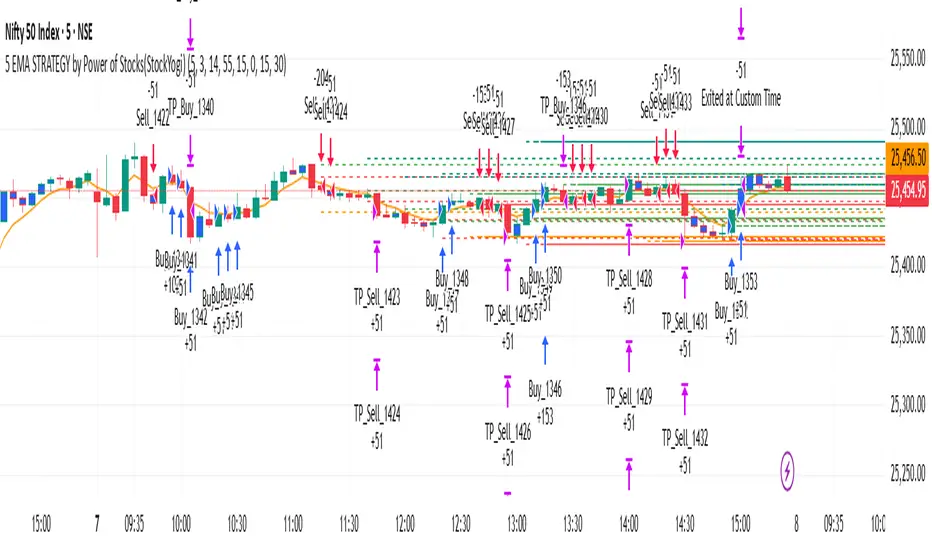
5 EMA STRATEGY by Power of Stocks(StockYogi)5 EMA STRATEGY by Power of Stocks(StockYogi)
This is a 5 EMA Breakout Strategy inspired by the trading principles taught by Shubhashi Pani, founder of the Power of Stocks (POS) community.
The strategy is designed to:
• Detect breakout setups when price breaks the high/low of a signal candle (based on EMA conditions)
• Enter trades only if the breakout occurs within the next 3 candles
• Allow multiple trades in the same direction without closing the earlier one
• Use independent stop-loss (SL) and take-profit (TP) targets for each trade based on a user-defined risk-reward ratio
• Optionally enter trades only at candle close
• Optionally avoid trades during a custom time window (e.g., 3:00 PM to 3:30 PM IST)
• Optionally close all open positions at a defined time (e.g., 3:30 PM IST)
The goal of this strategy is to provide greater flexibility and realism for intraday or short-term traders following structured breakout systems.
Disclaimer: This script is an implementation of technical ideas for educational purposes only. It is not financial advice. All trading involves risk, and past performance does not guarantee future results.
Strategy Credits:
This strategy is based on publicly known breakout rules taught by Shubhashi Pani (Power of Stocks). This is not an official POS script, and I am not affiliated with the Power of Stocks team. This implementation was developed independently to follow the logic shared for educational use.
Feel free to use, backtest, and modify according to your needs. Constructive feedback is welcome!

Lum3n Trend CloudLum3n Trend Cloud
The Lum3n Trend Cloud is a lightweight, easy-to-read trend indicator that helps traders quickly identify bullish, bearish, or neutral conditions using two customizable EMAs (Exponential Moving Averages).
How It Works:
The indicator uses a short-term EMA and a long-term EMA to determine trend direction.
A bullish trend is confirmed when:
Price is above both EMAs
The short-term EMA is above the long-term EMA
A bearish trend is confirmed when:
Price is below both EMAs
The short-term EMA is below the long-term EMA
All other cases are considered neutral or consolidating.
Visual Features:
Candle Color:
🟢 Lime = Bullish
🔴 Red = Bearish
🟠 Orange = Neutral
Trend Cloud Fill:
A color-coded band fills the space between the EMAs:
Green when bullish
Red when bearish
Orange when neutral
EMAs:
Green = Short-term EMA
Red = Long-term EMA
How to Use It:
Use trend direction for trade confirmation or directional bias.
Combine with price action, support/resistance, or volume for entries.
Neutral zones may signal consolidation, transitions, or chop — avoid overtrading here.
Inputs:
Short-Term EMA Length (default: 8)
Long-Term EMA Length (default: 21)

Smart Price Divergence (MACD Filter) + EMA
Smart MACD Price Divergence + EMA
This indicator automatically spots price divergences filtered by MACD momentum and trend direction with EMA:
🔹 Finds regular bullish & bearish divergences
🔹 Filters signals using a simple EMA trend filter
🔹 Clear triangle labels on the chart
🔹 Ready-to-use alerts for your strategy
Use it to catch potential reversal points when the trend may be losing strength.
How it works
Bearish Divergence: Price makes a higher high above the EMA while MACD makes a lower high → possible reversal down.
Bullish Divergence: Price makes a lower low below the EMA while MACD makes a higher low → possible reversal up.
The EMA filter helps spot extreme areas where the trend may be overextended.
Signal colors
🔻 Red triangle — Bearish Price Divergence (potential short)
🔺 Green triangle — Bullish Price Divergence (potential long)
Works on any timeframe and market (crypto, forex, indices, stocks).
✅ Subscribe to my profile to get new useful Pine Script tools soon!
💡 Want a custom version?
I can build private Pine Script indicators & strategies tailored exactly for you — scalping signals, trend or reversal strategies, custom filters for crypto, forex, stocks, or any pairs you trade.
I can also improve or fix your existing scripts.
If you want a unique, high-quality and profitable tool — contact me anytime!
📩 Telegram 👉 t.me


YAS GROUPFOR ALL YAS GROUP MEMBERS
🔥 مؤشر متكامل يجمع بين عدة تقنيات احترافية لتحديد أفضل مناطق الدخول والخروج بدقة عالية:
✅ مناطق الـ Order Blocks القوية (15m, 1H, 4H)
✅ نسب الفيبوناتشي داخل الـ OB لتأكيد نقاط الانعكاس
✅ إشارات شراء وبيع دقيقة مع إمكانية تفعيل فلتر RSI و EMA/SMA
✅ خطوط دعم ومقاومة ديناميكية مبنية على آخر Pivot Highs & Lows
✅ مناسب للسكالبينج، التداول اليومي، وحتى الصفقات المتوسطة والطويلة
🎯 يمكنك التحكم في شروط الفلاتر وتخصيص الفريمات التي تهمك بسهولة من الإعدادات.
💡 هدف المؤشر: مساعدة المتداول في اتخاذ قرارات مدروسة ومبنية على مناطق سيولة وتجمع أوامر حقيقية، وليس فقط إشارات عشوائية.
---
⚠️ ملاحظة:
- لا يعتبر هذا المؤشر نصيحة مالية مباشرة.
- يفضل استخدامه مع إدارة رأس المال ومراعاة الأخبار والتحليل الأساسي.
🔔 لا تنسَ تفعيل التنبيهات للإشارات المهمة!
🔥 A complete all-in-one indicator combining multiple professional techniques to accurately detect the best entry and exit zones:
✅ Strong Order Blocks zones (15m, 1H, 4H)
✅ Fibonacci levels inside OBs to confirm reversal points
✅ Highly precise Buy/Sell signals with optional RSI and EMA/SMA filters
✅ Dynamic Support & Resistance lines based on latest pivot highs & lows
✅ Perfect for scalping, day trading, and swing trading
🎯 Easily customize filters and timeframes directly from the settings.
💡 Goal: Help traders make more confident, well-informed decisions based on real liquidity and order flow zones rather than random signals.
---
⚠️ Disclaimer:
- This indicator is not financial advice.
- Always combine it with proper risk management, fundamental analysis, and market context.
🔔 Don’t forget to set alerts to stay on top of key signals!
مع تحيات محمد الابرزي وقروب ابو سلطان

High/Low de la Bougie Daily d'Hier🧩 General Description
This indicator plots two horizontal lines on your chart every day:
One line at the High of yesterday’s daily candle
One line at the Low of yesterday’s daily candle
It is designed to help you quickly identify key market levels based on the previous day’s range — often used as:
Support/resistance zones
Breakout or rejection areas
Reference points for intraday strategies (e.g. New York session trading)
⚙️ How It Works
The indicator uses request.security to fetch data from the daily timeframe, regardless of the chart timeframe you're trading on (e.g. M15, H1).
It captures the high and low from yesterday’s daily candle.
These levels are displayed on your current chart using horizontal lines extended to the right, which automatically update every day.
🎨 Visual Style
High of yesterday: green, dashed line
Low of yesterday: red, dashed line
Lines are refreshed on every new bar to stay clean and updated

Vùng đỉnh đáy chính theo phá vỡ (dùng line)Indicator Name:
🔺 Key Swing Zones Based on Breakouts (Line-Based)
Short Description:
This indicator automatically detects and visualizes key swing highs and lows based on the principle of candle close breaking the wick of the previous candle, then classifies the current market trend as uptrend, downtrend, or neutral. It draws horizontal lines representing key zones and adds visual labels to help traders analyze market structure more clearly.
How It Works:
🔹 Reversal Signal Logic:
In an uptrend, if a candle closes below the previous candle's low, it marks a swing low.
In a downtrend, if a candle closes above the previous candle's high, it marks a swing high.
🔹 Structure Break Detection:
Price breaking above a key high → confirms an uptrend.
Price breaking below a key low → confirms a downtrend.
If price breaks a zone but doesn't form a new high/low → switches to neutral.
🔹 Visual Display:
Draws two horizontal lines: one at the key high, one at the key low.
Adds labels "Key High" or "Key Low" at the breakout points.
Zone color representation:
🟢 Green = Uptrend
🔴 Red = Downtrend
⚪ White = Neutral

Smart Deviation Trend Bands PRO + MTF Filter
Smart Deviation Trend Bands PRO + MTF Filter
This advanced version of Smart Deviation Bands gives you everything you need to catch cleaner trend bounces and avoid fake signals.
🔹 Classic deviation bands with 1, 2 and 3 standard deviations
🔹 Dynamic SMA line with clear trend coloring
🔹 Built-in multi-timeframe trend filter (MTF)
🔹 Signals only appear when they align with the higher timeframe trend
🔹 Ready-to-use alerts for bullish and bearish bounces
How it works
When price bounces off a deviation band AND the higher timeframe trend confirms, you get a clean signal.
Use multiple deviation levels to spot deeper or shallower pullbacks.
The higher timeframe filter reduces noise and keeps you trading with the bigger trend.
Signal markers
🟢 Green circle: Bullish bounce — price crossing up from lower band with HTF uptrend.
🔴 Red circle: Bearish bounce — price crossing down from upper band with HTF downtrend.
Works best with:
Any market: crypto, stocks, forex
Any timeframe — filter works from M5 to 1D+
Adjustable filter timeframe: use H4, 1D, 1W — up to your strategy
📌 Subscribe to my TradingView to not miss new useful scripts and updates!
💡 Need a custom version?
I create private Pine Script indicators and trading tools on request — scalping, trend, breakout, or custom strategies for any market.
Contact me if you want a unique script built for your exact trading style!
📩 Telegram 👉 t.me

PRO-ZLMA RSI MACD [XAUUSD]Effective Scalping Strategy for XAUUSDStrategy LogicZLMA to catch reversals early but smoothlyEMA 200 as a trend filter (confirms Long/Short more accurately)RSI filters overbought/oversold price areasMACD confirms momentumoptimize and analyze your indicator strategy — aiming for the highest profits across various time frames (1M, 5M, 30M, 1H, 4H, 1D) when trading XAU/USD:
